Voting with Mobile-ID in Estonia – how it looks

ID-infrastructure in Estonia – general info

As you may know Estonia has really great digital identity infrastructure. We can sign fully legal documents (I mean ALL documents) either with our ID-card or with our Mobile-ID. While the first is more common the latter may need some explanation and examples. In both cases there are certificates on the chip (on the SIM-card) and they’re protected with strong crypto. The private certs and keys never leave the chip. For proper authentication 2 things are needed:
– your certificate (on the chip)
– your PIN-code that unlocks the private key on the chip

So the PIN code and the chip alone are pretty useless and thus secure. So much about theory. Now some examples.

Voting with Mobile-ID

I’m on OSX so the examples are based on that fact.

First you download an app from the official elections website https://www.valimised.ee/mac

Open the app and there you see choices for authentication. They’re pretty self explainable.

v1
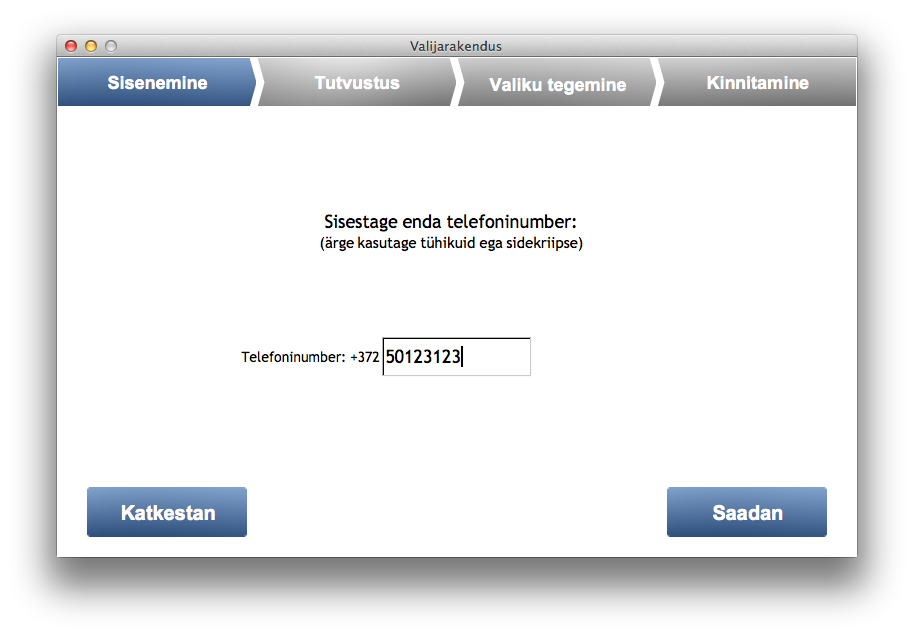
When I click on mobiil-ID (Mobile-ID) the following dialog appears. It asks for my mobile phone number in order to send me Mobile-ID authentication message. The phone number entered is not mine. Don’t use it:)

v2


After clicking on big blue button “Saada” (Send) the following waiting dialog appears. During that dialog is visible I get a message to my phone that opens special SIM-card application and asks for my Mobile-ID PIN-1:v3

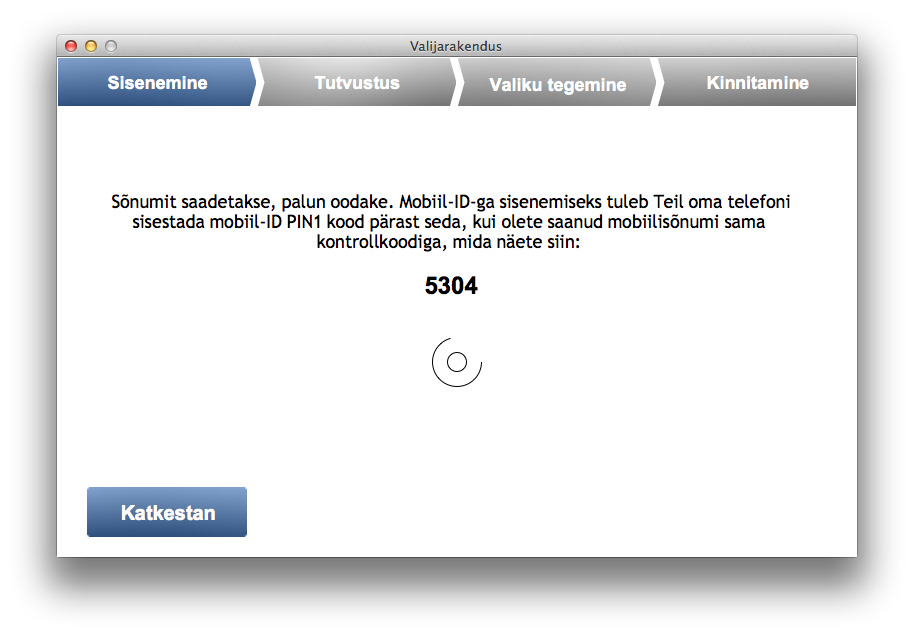
On my mobile phone I see dialog like this:


screenshot_2013-10-10_1214


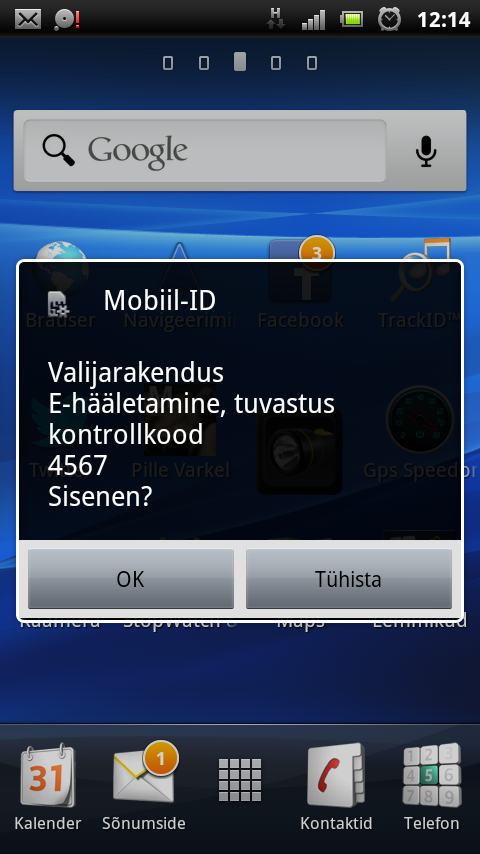
Mind the numbers 5304 and 4567. These don’t match in my example because I made the screenshots from different sessions. These must match, otherwise something’s fishy and someone else might have sent you authentication request (not good).

I enter my PIN-1 on my mobile and that opens my authentication certificate. Background magic happens in ID-infra and I see next screen in my voting app:

v4


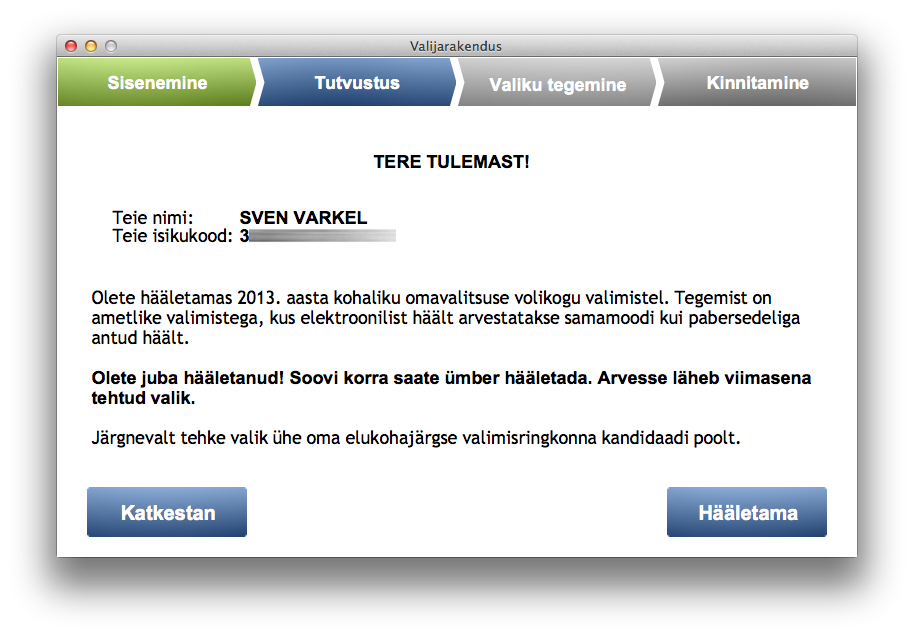
It welcomes me with my name and my personal ID-code (blurred). Then it explains that I can vote and blahblah… In bold it’s important message: it says that I’ve already voted. The trick is that I can vote unlimited times electronically but only the last vote is counted! Even better – if I change my mind then I can got and vote on the real (physical) elections day and then the vote made there will count. But who bothers going out if you can vote like this?:)

I click “Hääletama” (To voting) and I see next screen:

v5


This is the list of candidates. I make my choice and I see it like this:

v6


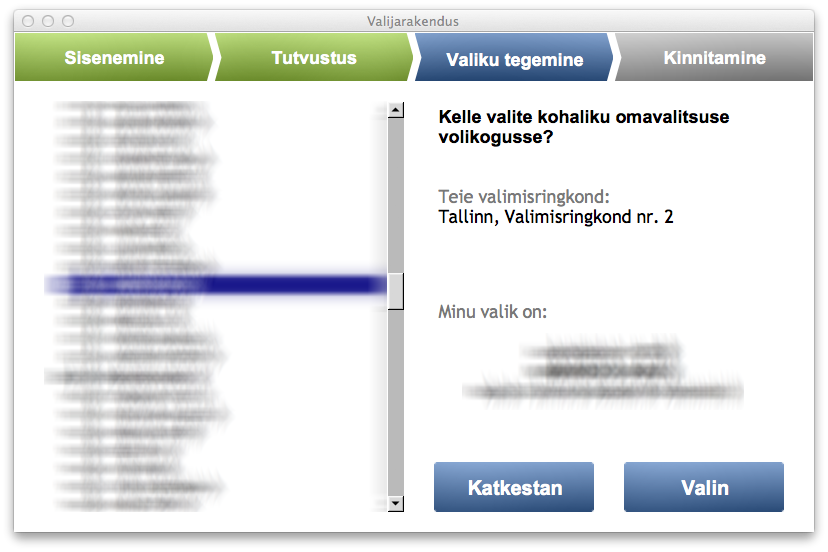
I don’t want to advertise anyone so it’s blurred. Then I have button “Valin” (Vote). After clicking on that I see confirmation screen:

v7


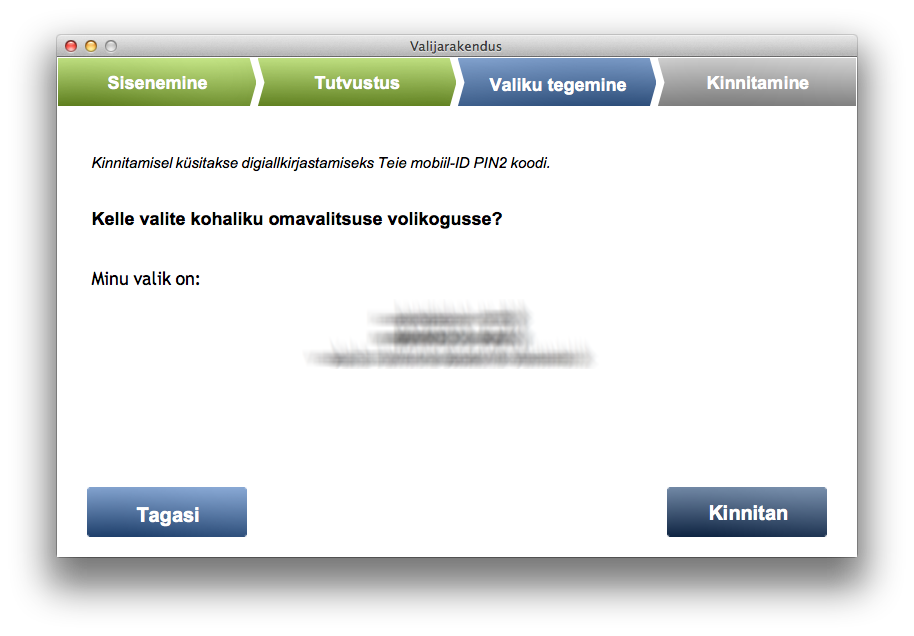
After I click on “Kinnitan” (Confirm) a second message is sent to my mobile phone. I see waiting screen like this:

v8


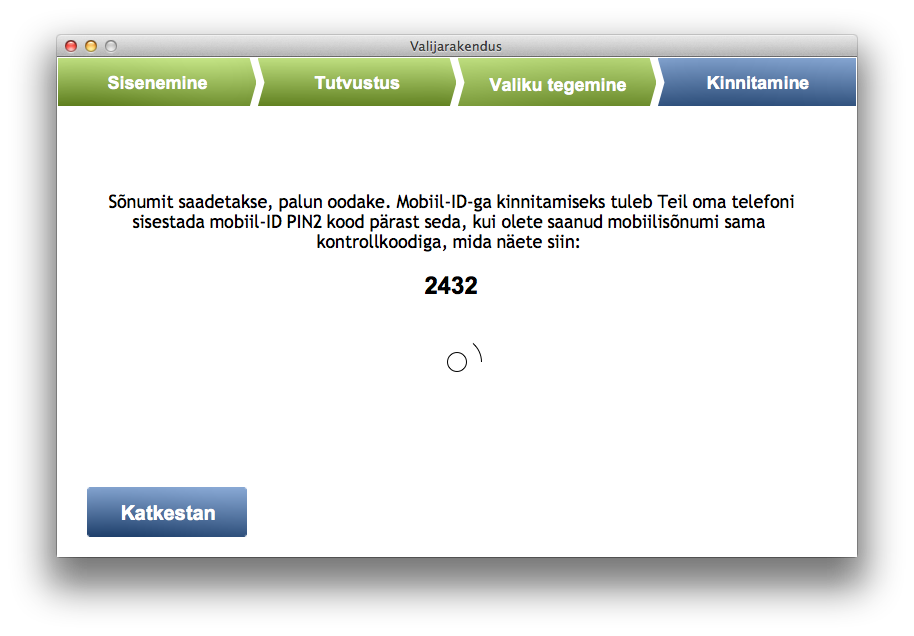
On my mobile I see similar screen as above but this time I’m asked my PIN-2 code which is meant for opening my signing (signature) certificate. After entering PIN-2 I see confirmation screen like this:


v9

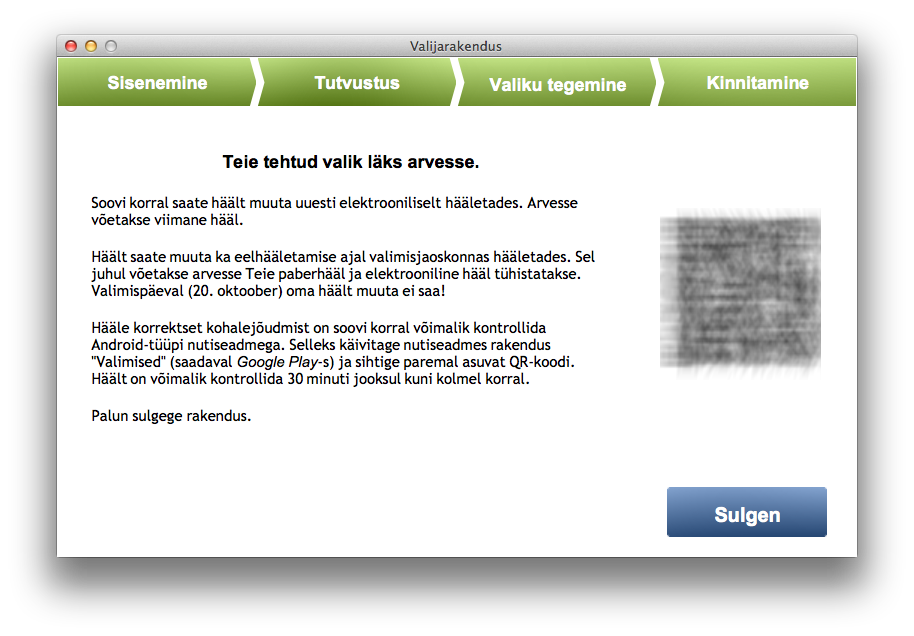
It shows me a QR code that I could use to verify if my vote was accepted and stored properly. It can be verified 30 minutes after voting and max 3 times for security reasons. That’s why I blurred the QR also.

That’s it. It takes max 5 minutes if you know who’s your preferred candidate!:)

I hope whole Europe would adopt our digital ID infrastructure soon.

Go, Estonia!

Building GNUPG for PHP 5.5 on OSX

It’s quite tricky to build gnupg php extension on OSX. I’m using homebrew, so I installed necessary dependencies first:

brew install gpgme

This goes well as most things with brew.

Then I’m trying to install GNUPG PHP PECL extension as the instructions tell me to do:

sudo pecl install gnupg

Bang!!!

I get weird errors like these:

duplicate symbol _gnupg_keylistiterator_class_entry in:
.libs/gnupg.o
.libs/gnupg_keylistiterator.o
duplicate symbol _gnupg_class_entry in:
.libs/gnupg.o
.libs/gnupg_keylistiterator.o
ld: 2 duplicate symbols for architecture x86_64
clang: error: linker command failed with exit code 1 (use -v to see invocation)
make: *** [gnupg.la] Error 1
ERROR: `make' failed

“Tough luck”, I think. But wait… After some googling around PHP bugs I got some hints.

So here’s what you got to do:

  1. download pecl extension source code
  2. fix 2 lines in .h and .c files
  3. phpize, configure and make
  4. configure PHP extension
  5. == Profit
pecl download gnupg

In my case it downloads files to /Users/sven/soft/php-5.5.4/ext/gnupg-1.3.3/gnupg-1.3.3.tgz

Unpack the archive:

tar xzf gnupg-1.3.3/gnupg-1.3.3.tgz
cd gnupg-1.3.3

Open file php_gnupg.h and add comments and explanation around line 50:

/* moved next line to gnupg.c
zend_class_entry *gnupg_class_entry;
 */

Copy the line zend_class_entry *gnupg_class_entry; to buffer. Save and exit.

Open file gnupg.c:

Find lines (around 177) and paste copied buffer so it looks like this:

zend_class_entry *gnupg_class_entry;
/* {{{ objects_new */
zend_object_value gnupg_obj_new(zend_class_entry *class_type TSRMLS_DC){

Do similar things with files gnupg_keylistiterator.c and php_gnupg_keylistiterator.h.

Open file  php_gnupg_keylistiterator.h around line 69:

/* moved next line to gnupg_keylistiterator.c
 zend_class_entry *gnupg_keylistiterator_class_entry;
 */

Copy line zend_class_entry *gnupg_keylistiterator_class_entry; to buffer. Save and exit.

Open file gnupg_keylistiterator.c around line 72 and make it look like this by pasting buffer:

zend_class_entry *gnupg_keylistiterator_class_entry;
/* {{{ keylistiterator_objects_new */
zend_object_value gnupg_keylistiterator_objects_new(zend_class_entry *class_type TSRMLS_DC){

Save and exit.

Configure, build and install: ./configure make clean && make make install

Now you should have php extension gnupg.so somewhere. I have it in my Cellar:

/usr/local/Cellar/php55/5.5.4/lib/php/extensions/no-debug-non-zts-20121212/gnupg.so

Wherever it is, copy the path to buffer.

Open a new file (your php-s conf.d may be somewhere else!)

vim /usr/local/etc/php/5.5/conf.d/ext-gnupg.ini

And add following lines there:

[gnupg]

extension="/usr/local/Cellar/php55/5.5.4/lib/php/extensions/no-debug-non-zts-20121212/gnupg.so"

Save and exit. Be sure to replace path if your gnupg.so is somewhere else.

Test your php:

php --ri gnupg

It should display something like this:

gnupg
gnupg support => enabled
GPGme Version => 1.4.3
Extension Version => 1.3.3-dev

Thanks!


Setting up Magento development environment, step by step. Part 2: Underlying systems and processes

Underlying systems and processes

Welcome back to Measure9 blog. Here I continue with article series “Setting up Magento development environment, step by step“. Please read Part 1, too. In this post I’m going to shed some light to surrounding processes and most low level tools. So we go from  general to more specific with each subsequent article in this series.

Development process

A quite generic Magento Development Process looks like that. It involves an Issue Tracking System (ITS) and Version Control System (VCS). Also unit testing is in place. If you’re really after quality and fun in development then I do recommend to set up Continuous Integration solution. There is quite a number of solution like Bamboo, Jenkins and others.

Magento Development Process


Version control process

Version control is something that should be in place even if you’re working alone. It helps you to keep your work organised, establish good working habits and integrate your work thru various environments and phases of a project’s lifecycle.

There is a number of Version Control Systems available. To name a few that you already may have heard of:

  1. GIT
  2. Subversion
  3. Mercurial
  4. CVS
  5. ClearCase

See more from Wikipedia. The first 3 are quite modern while CVS is an old dinosaur and ClearCase is a proprietary yet very powerful and integrated system by IBM. Anyway, my gut feeling says that GIT is most widely used nowadays and there are reasons for that.

GIT is

  1. distributed – you can work offline and still keep stuff under control
  2. fast – I mean it’s really fast:)
  3. easy to use, supports easy branching and merging
  4. last but not least – invented by Linus “The Linux Guy” Torvalds himself. Quality…

Now about the process itself (when git is used):

VersionControlProcessGit

Explanation from left to right:

When you start a project you do git clone (1). This gives you working folder with all project’s files. You do it once. Then, every day after your morning coffee you do git pull (2). Git pull gives you updates that have been pushed to upstream by other developers. After that you do git branch (3) if you haven’t done it already. This gives you isolated branch where you can mess around with the code any way you want. There is a number of branching strategies around, you need to choose what suits you best. There’s also a good example of a successful git branching model. Now you’re working with the code and you do git commit (4) (save code version to git). It’s recommended to keep commits small, I’d say atomic. Minimum one commit per fix or per issue from the ITS or per file. You’ll see that it’s good to keep commits small because when they day of rollback comes (and it will!) then you’d be grateful you did small commits that can be rolled back one by one. Then you feel that you’re ready to share your work with others. So you do git pull (5) again to retrieve latest changes from the remote and master branch. Then you merge (6) master branch into your named branch and if it’s cool (no merging errors) you’ll merge your changes back to master. Then you do git push (7) and share your work with others.

Some day (when I have time) I’ll add command line examples here, too.

Choosing hardware and installing operating system

Magento is a resource hog and thus good development hardware is a must. I’m personally using Macbook Air that has SSD permanent storage. It’s fast but standard MB Airs have only 4 gigs memory that is too little:( So you better get yourself a machine with following specs:

  • >= 8 GB RAM
  • >=128 GB SSD disk
  • A good (dual head) video card (for dual monitors)
  • A good keyboard
  • A mouse
  • A pair of good speakers (in case you’re working in your own room;))

Operating system

OSX and Linux are both good choices for Magento (or any web) development. For OSX there’s excellent package manager homebrew that gives you all necessary tools if you’re not satisfied with already built-in Apache web server and somewhat oldish PHP 5.3.

With Linux it’s simple – choose a distro that you like. My recommendation is Ubuntu or Debian. The both have APT package manager that satisfies all your needs.

Installation and configuration of tools will be covered in future posts.

Command line, Terminal application

One more thing is the terminal application. I think the the Linux’ defaults are good but there’s a better alternative for OSX’ Terminal.app and this is iTerm2. Install and use this one instead of native Terminal.app. It provides a few very good convenience functions like “copy when select” and similar.

Resolving Magento extension rewrite conflicts using traits

A bit of history

On 5th of September I sent out a tweet:

Guys, this is serious. I guess, I just resolved Magento’s single intheritance problem by using traits. Details later. #magento #worksforme.

Those who have been serious in hacking Magento and 3rd party extensions know well what I’m talking about. But please let me explain further.

Magento extension rewrite conflicts

You have a Magento instance. You have created a custom module My_Custom that happens to rewrite a core model, let’s say Mage_Catalog_Model_Product. So you have following lines in your module’s config.xml:

Then you have have a 3rd party extension that rewrites the same core class. You’re stuck now? Not quite. You now have 3 good methods to fix the problem. So good so far. But then you need another 3rd party extension that does the same – rewrites catalog/product. Now you’re stuck, right!?
You cannot make your code extend the 1st extension because the the second wouldn’t work and you cannot make yours to extend the second either because the 1st wouldn’t work then. Chicken and egg problem or “nokk kinni, saba lahti” as we say in Estonian.

The solution – PHP 5 feature “traits”

There’s a solution to PHP’s single inheritance feature and Magento rewrites that together make a problem. The solution is achieved by utilizing PHP 5.4 (or newer) feature called traits. So get a coffee (it’s pretty long post) and let’s start.
We have a situation where 3 classes want to rewrite and extend Magento’s Mage_Catalog_Model_Product:
My_Custom_Model_Product (this is mine that I can freely change)
Extension_A_Model_Product
Extension_B_Model_Product
Let’s say Extension_A_Model_Product adds the following methods to catalog/product:
And let’s assume Extension_B_Model_Product wants to add the following methods to catalog/product:
And at last my custom module wants to add something extra to the core product model:

The idea is to make only My_Custom_Model_Product to rewrite catalog/product or at least to be the first one selected for rewrites. The other 2 3rd party module classes would just extend it and be used inside my product model via traits.

Add dependencies to your module

First it’s necessary to add dependencies to your module XML. This is to ensure the loading order of classes and rewrites.

Add traits

Folder Traits should be created under extension’s folder in similar manner to Block, Product and Helper:
My/Custom/Trait.
For naming we follow the same logic as other Magento building blocks but there’s no shorthand for traits as it exists for blocks, models and helpers (e.g catalog/product etc). No worries, the trait would still be found and loaded by the autoloader.
Under that folder create the trait folders and files for classes Extension_A_Model_Product and Extension_B_Model_Product
My/Custom/Trait/Extension/A/Model/Product.php

My/Custom/Trait/Extension/B/Model/Product.php

Trait for Extension_A_Model_Product

Trait for Extension_B_Model_Product

Add traits to My_Custom_Model_Product

Voilaa!:) Now you have all the 3rd party module functionality available in your extension. When Magento is calling getModel(‘catalog/product’) it will actually load My_Custom_Model_Product. My_Custom_Model_Product extends Mage_Catalog_Model_Product and it also exposes all methods from Extension_A_Model_Product and Extension_B_Model_Product.

A note about traits

With traits you can avoid duplicating original class method implementation’s part. You’ll just create a proxy for original class method’s thru the trait. However you need to maintain the traits whenever Extension_A or Extension_B are upgraded or changed. So you should document it that you created traits and solved multiple rewrite problem this way. Then you can look up the documentation when doing upgrade to extensions next time.

As always – feedback is welcome!

Setting up Magento development environment, step by step. Part 1: Introduction

Intro to article series

In this serie of articles I’m going to provide step by step instructions for setting up a fully working development environment for your Magento (or actually ANY PHP5) development project.
I start from the lowest level – from choosing the hardware and the article series will be finished with tips for tuning your Nginx, PHP5 and MySQL (MariaDB) to squeeze out the maximum performance that you need whole developing Magento.

About naming things

Here and there I call the database server as “MySQL” but what I mean is MariaDB 5.5.
Here and there I may call PHP5-FPM “PHP5” for the sake of shortness.
When I say PHP or PHP5 I mean the most recent version PHP 5.5.
OSX – I mean the current official version 10.8 Mountain Lion as of time of writing this post.
Linux – I mean Debian 7 – “Wheezy”.

Words of warning or The Disclaimer

First – nobody is (unfortunately:)) paying me anything to promote their software. All choices have been made based on my loooong experience in this industry and some research I’ve done before and during writing if this article series. I’ll try to provide some more justification of choices made under every section for every important component.
Everything described in this blog must be taken with caution. I mean – think twice (and measure 9 times!) before you put anything to production environments. I don’t take any responsibility or blame for data loss or loss of your job or whatever loss that may or may not be caused by following my instructions. In short – I write whatever I want and you’re the one that must think before executing anything written here. This is called “talupojatarkus” or “common sense” in Estonia🙂

Now when this is clear let’s get the hands dirty!

The structure of articles

I’ll give you instructions for 2 major development platforms – Linux and OSX. In general these 2 are perfect platforms for web development. One is free and open source while the other is commercial yet very good.  So you have choice.
The articles are organised like this where all major bullets are articles:

  1. Introduction (current article)
    1. A few words about suitable hardware
    2. No promises made but still … (planning following articles)
  2. Underlying systems and processes
    1. Development process
    2. Version control process
    3. Choosing hardware and installing operating system
    4. Remove unwanted stuff
    5. Command line, Terminal app
  3. Naming and structure
    1. Development folders
    2. Development hostnames (virtual hosts)
    3. Usernames, passwords
    4. SSH keys
  4. Components installation & configuration
    1. MariaDB
    2. PHP5-FPM
    3. Socket or TCP?
    4. Nginx
    5. a special file /etc/hosts
    6. Openssl for HTTPS
    7. keys, self-generated certificates
    8. optional – phpMyAdmin
  5. Source Code Version Control
    1. git …
    2. … or svn. No and why?
    3. Bitbucket
    4. Github
    5. Beanstalk
  6. Security
    1. Bind MySQL to localhost
    2. Keep your sites closed when in public WIFI-s
    3. Use HTTPS
  7. Installing Magento
    1. create database, db user and password
    2. file permissions
    3. special folders
    4. .gitignore
    5. useful utilities
  8. Choosing the IDE
    1. Netbeans
    2. PHPStorm
    3. Others (Komodo, Zend Studio)
  9. Setting up xDebug for debugging your solution
    1. “Local” remote debugger
    2. Breakpoints
    3. Call stack
    4. Variables
    5. Remote debugger
  10. Performance tuning, tips and tricks
    1. MariaDB
    2. Nginx
    3. PHP5-FPM
I leave myself freedom to make improvements to the topics while the serie is developing. 

A few words about suitable hardware

Currently I use Macbook Air with 4 GB RAM and I must say it’s too little. Magento is a big and hungry beast , all IDE-s are in hunger for more and more memory (Java!) and when you want to use xDebug then you’re pretty much stuck. So MB Air can almost do with SSD saving the day but my next machine will be something with 8 GB of RAM or more. I guess nobody’s talking about desktops nowadays any more, right? Still – an iMac is good choice in case you don’t need to move around to much. Since I do a lot of consultation and solutions architecture I have to be in the meetings and it would be a bit tedious to haul an Imac or – even worse – a PC with a monitor around, right…:) OK, I’m joking but in short – a good laptop is a good choice nowadays. Choose a PC laptop or a Mac laptop based on budget or whatever the reasons are – I’ll provide instructions for both.

No promises made but still …

As a busy guy I cannot make big promises but I’ll do my best to provide you a minimum 1 article a week. Hopefully I can do better than this. Feedback is very much appreciated as my ultimate goal is to develop a solution that would be kind of standard for all Magento development projects that are yet to be launched. So all help and feedback and comments are welcome.

Provide feedback

Here’s the first request to you, dear readers – please provide your wishes in the comments about what you’d like to read about in this serie or if there’s anything important that I forgot from the TOC. Thanks!

A mindnote regarding Zend 2.0 and interfaces

In Zend FW 2.0 the standard src folder (and namespace) structure is the following:

src\MyNamespace\Model - models
src\MyNamespace\Controller - controllers
src\MyNamespace\Helper - helpers, utilities

However I wanted to follow the same logic for interfaces I failed. The following does not work:
src\MyNamespace\Interface - interfaces

That’s because “Interface” (and interface) is a reserved keyword in PHP.

Mindnote here for next time –  I have to make exception for interfaces and name my namespace (folder) for interfaces in plural:
src\MyNamespace\Interfaces

Digital carbage and how to reduce it

Digital carbage

I’m afraid we will drown into digital carbage one day. That day is not necessarily in the far future but it can be this week or next.
One of the biggest soure of digital carbage is corporate e-mails with attachments. In every corporation, in every project there are working groups that still (in the year 2013) share a lot of information via e-mail. These people often add information to e-mails in form of attachments that makes it worse.

Attachments and versions

The problem with sending e-mail attachments is that when you send it to n persons you would instantly create at least n+2 different versions of the file. The situation is even worse if you added multiple attachments to your e-mail that you’re going to send – let’s say to 5 colleagues (3 from your office + 2 contractors or whoever).

By doing that you will create following versions of your file(s):
– one in each recipient’s mailbox (ouch – which one is original now?) – that is n
– one on your harddisk (so-called original) – that is n+1
– one in your sent-mail folder (is that original?) – that is n+2

When each recipient saves the attachment(s) from e-mail to harddisk more versions will be added.

My question is – which version is correct?

The solution

The solution is elegantly simple – use cloud services and shared documents. There are a number of such services while most popular are Google Drive and Microsoft Skydrive. Even Dropbox would work however it could impose some file locking issues. I know about corporate policies and rules (I worked at Ericsson for many years) but this is no excuse for polluting the digispace.
One document in one place shared to those who have to work with that. Easy. Simple. Done.
Any thoughts on that?

Logging PHP errors in the same folder with Magento error logs

Here’s another post regarding logging…

How to log PHP errors to the same folder than Magento error logs?

It’s quite simple with Nginx and PHP5-FPM. In Nginx virtual host configuration file there is quite likely block like that:

location ~ .php$ {
if (!-e $request_filename) { rewrite / /index.php last; }
fastcgi_pass unix:/var/run/php5-fpm.sock;
fastcgi_param HTTPS $fastcgi_https;
fastcgi_param SCRIPT_FILENAME $document_root$fastcgi_script_name;
fastcgi_param MAGE_RUN_CODE ee;
fastcgi_param MAGE_RUN_TYPE website;
fastcgi_read_timeout 600;
include /etc/nginx/fastcgi_params;
}

In order to make PHP error logs go to the same folder than Magento’s (/var/log/… add following lines to your virtual host configuration block:

    fastcgi_param   PHP_VALUE "log_errors=on";
fastcgi_param PHP_VALUE "display_errors=off";
fastcgi_param PHP_VALUE "error_log=$document_root/var/log/php_errors.log";

These are standard PHP directives.
log_errors – this one states that erros must be logged
display_errors – it’s always good to keep it off anywhere else than in your local development machine
error_log – this does the trick. It forces PHP logs for current virtual host to var/log folder under your Magento instance folder.

So the final block should look like this:

location ~ .php$ {
if (!-e $request_filename) { rewrite / /index.php last; }
fastcgi_pass unix:/var/run/php5-fpm.sock;
fastcgi_param HTTPS $fastcgi_https;
fastcgi_param SCRIPT_FILENAME $document_root$fastcgi_script_name;
fastcgi_param MAGE_RUN_CODE ee;
fastcgi_param MAGE_RUN_TYPE website;
fastcgi_read_timeout 600;
fastcgi_param PHP_VALUE "log_errors=on";
fastcgi_param PHP_VALUE "display_errors=off";
fastcgi_param PHP_VALUE "error_log=$document_root/var/log/php_errors.log";
include /etc/nginx/fastcgi_params;
}

Restart nginx and there you go. You can now tail or less the logs from /var/log/php_errors.log

Magento solution development in distributed environment

Background

Magento solutions get bigger and more complex, at least here at Eepohs. Magento development requires multiple displines like Frontend Development (JS, CSS, HTML, XML etc), Backend Development (PHP, JS, XML etc), System Integration (JSON, XML, REST, SOAP, (s)FTP etc…). So it’s quite obvious that Magento development is rather teamwork than a play of single freelancers. Freelancers can take your solution to some limit but sooner or later you need to hire a team that can support solution and take it further on.

Tools

There are a couple of tools that are crucial for teamwork and especially important when your team is not sitting together but is distributed in the room and possibly in time also. The tools for successful teamwork are:
– issue management tool – JIRA
– version control tool – GIT
– communication tool – Skype
– an IDE – Netbeans

Processes

When you have more than 1 developer you need a process. In fact you’d need a process when you’re working alone, too but it’s not that stringent in this case.
You have several processes while doing development:
– version control process and strategy
– issue management process
– general workflow
– development itself – writing code, chasing bugs, debugging etc.
– quality assurance (QA)
– deployment process

The latter seems to be quite tough because there’s a lot to be deployed between different stages and instances.
There are 4 stages (and n different Magento instances in each) in Magento development cycle
– development (local developer machine, local server)
– testing (internal testing by the QA team)
– staging or pre-live (pre-live testing by the QA team and the customer)
– live

Deployment of changes


A note about popular alternative – Subversion

Subversion is not good for Magento development for 2 reasons:
  1. it must be connected to central server. So you cannot version your files while working offline
  2. svn creates its own special control folder .svn with a lot of extra files inside every folder in Magento. Magento codebase is huge and svn creates a very big extra overhead for your filesystem. It makes it painfully slow and tedious.
  3. … I won’t start rant about merging in svn and git here…:)
  4. And yes – I have used svn, A LOT. So I know what I’m talking about:)

Magento specific issues a.k.a the Bad News

Attribute sets and attributes

How to manage attribute set and attribute migration between 4 stages described above?

The 2 above are actually quite simple to resolve. Magento offers excellent tools for that – install/update scripts. Just add your attributes and sets via install/update scripts and they will get to all environments automatically when code is deployed there.

Stores and Content

Store is the most crucial entity. Everything is depending on that, even configuration and content.

Configuration

That’s a tough one. How to version configuration? How to move conf changes from one Magento to the other?

Magento Deployment tools a.k.a the Good News

There’s a cure for all these issues above, though… I’ll shed some light to available tools in the upcoming posts.

A few thoughts about code quality

While working with Magento I see a lot of 3rd party software (Magento extensions). I must say that the code quality in general is very poor. It’s not that poor as in WordPress in the old days but it’s bad. I’m not even talking about following Magento Coding Standard. I’m talking about simple and basic things:

  1. PHP code that produces ERR in Magento log is to be considered broken. 
  2. PHP code that produces WARN in Magento log is to be considered nearly broken and dangerous.
  3. HTML code that does not validate is to be considered broken.
  4. JS is simple – if some JS is broken on they thru parsing then very likely the rest of it (all other libs, scripts) won’t be parsed correctly. It’s very visible in the frontend.
I cannot accept it. 
What to do? Educate yourself, check your code, use CodeSniffer, write Unit Tests and check the logs.