No comments:
Archives for : October2013
Naming and structure
Welcome back to Measure9 blog. Here I continue with article series “Setting up Magento development environment, step by step“. Please read Part 1 and Part 2, too.
I write about naming of things in this post. It’s important, it’s very important because in the long run it defines how you and you’re colleagues are going to talk about things, how you point at things and so on. It’s important to use common terms to build common understanding. Also I’ll explain the importance of SSH keys. I’ve learned to name things thru standards, conventions used in frameworks and long time industry-experience.
I’d like to start with this infamous and very good quote by Phil Karlton:
There are only two hard things in Computer Science: cache invalidation and naming things.
General rules about naming
- Never ever use special characters, other than ASCII letters in your file and folder names. Regardless of what Operating Systems claim there will be problems as soon as you move files around between different platforms and systems. I guarantee that. I’ll buy you a beer if you can prove that you’ll never had any problems with file/folder names with special characters 🙂 It’s especially important in non-English countries like Estonia (we have õ, ä, ö, ü), Germany, Sweden, Russia… Basically anywhere outside US and UK. (Side note – regardless of file names your application, your code, your files etc must be in / support UTF-8. That’s a standard.)
- Be very careful with case of names, especially when you’re working between case sensitive (all Linuxes), partly case sensitive (OSX) and case insensitive systems (Windows). Always prefer lower case where possible but as you know – Magento’s and Zend’s standards state some rules about class names etc. So just be careful and consistent.
- Avoid spaces in file and folder names.
- www-prefix is so-20th-century. My suggestion is to phase it out and let it go …
Development folders
Magento development folders/repositories/virtual hosts are kept under /srv/vhosts. Under that folder there are project folders. Usually one project has one, main domain name and it makes sense to name your development folder according to that. It’s easy to remember and it’s unique. Let’s say your customer is example.com. So your folder structure would look like this (explanation is below):
/srv
    /vhosts
        /example.com
            /conf
            /database
            /doc
            /design
            /keys
            /public
            /util
conf – virtual host configuration and other configuration files are in this folder
database – database change scripts, temporary dumps and other database-related stuff this is here
doc – here is project and code documentation (for example generated by ApiGen). Don’t hesitate to use external tools like Google Drive and a WIKI for documentation!
design – here are working PSD files of the theme, HTML templates etc, bought themes, generated/exported graphics, icons etc.
keys – keep SSL certificate keys and other keys in this folder. Here you can also keep project-related passwords in an encrypted file if you’re old-fashioned;)
public – this is the document root of your Magento. In other words this is the public folder that is served by your web server to end users. There are lots of other names that are used for this folder like html, pub, htdocs and so on. I decided to stick to public because it’s used in Zend Framework 2 and it says what it is. Always do remember that this folder is public, publicly accessible!
util – utility and helper scripts are kept in this folder.
Development hostnames (virtual hosts)
Most developers are working in local development machine and this tutorial assumes this way of working. In some cases people use hostnames like example.dev or example.local in their local development machine and these names are pointing to 127.0.0.1 i.e localhost. There are reasons to do like this but this is not good when you need to test integrations like Oauth. Google’s API Console does not support .local domain names. That’s why I suggest usage of following naming structure:
dev.example.com – point it to 127.0.0.1 in your /etc/hosts file.
test.example.com – point it to your test server in DNS.
However usually the DNS is under customer’s control and making changes there is time consuming or impossible. To overcome that you need to use YOUR domain for development and your own / your ISP-s DNS. If that’s the case you could use common naming scheme for development and test:
example.com.dev.mydomain.com – point it to 127.0.0.1
example.com.test.mydomain.com – point to to your test-server’s IP-address
staging.example.com – staging is also called pre-live. It’s an exact copy of live environment but usually it’s using less hardware / virtual servers. It’s the server where content and changes are staged before deploying these to production system (which is example.com or www.example.com).
If customer is having problems with DNS configuration then you can use your own DNS for the staging site also:
example.com.staging.mydomain.com – point it to the staging server’s IP-address
Usernames, passwords
My recommendation is to use e-mail addresses as usernames everywhere where possible. It’s not possible in most Linux shells but it’s possible in Magento’s frontend and backend. People, I mean – nerds and hackers, use all kinds of nicknames but it’s kind of … childish. Isn’t it? So use your e-mail as username in all your Magento solutions (BE and FE) and you and your colleagues know that and they don’t have to ask you every time. Easy to remember and easy to use!
About passwords. Try to avoid them as much as possible. They are just so insecure. Implement Oauth for Magento’s FE and BE login. Ask me if you need help with that.
If you need to create a password for a user for any reason then:
- make it complex (at least 12 characters, uppercase, lowercase, numbers and special symbols in it).
- make it expired so user must change it at next login and you don’t need to know it.
passwd -e username
This command would expire password for username and she will be prompted for password change at her next login.
Another useful command is
passwd -d username
That command would remove password from the user’s account so that user can login with SSH key’s only (see below).
In Magento backend create a random password for your colleagues, forget it right there and ask your colleagues to use “Forgot password?” link to reset their password. You’ll test e-mail functionality of your Magento server this way, too 😉
SSH keys, logins, aliases
SSH keys are an excellent way to login without passwords. There is one very important thing to be remember about SSH key pairs:
SSH private key MUST NEVER leave the machine where it was created.
Translation to English: use SSH private key only on that machine where it was created. If you need another one, generate it and distribute another public key.
SSH key pairs can be generated with a simple command:
ssh-keygen
The default values are good in most cases. After you generate the key pair you will have 2 keys in your ~/.ssh folder:
- private key
- public key
The public key is “inherited” from the private key. Public key as the name says is public. After generating keys you need to distribute the public key to the servers where you want to log in. Usually the public key must be appended to the file ~/.ssh/authorized_keys. In Linux systems there is also command ssh-copy-id that is meant for distributing your public key. Use your password for the last time to distribute your public key and forget/delete your password:)
I’ve created a small helper script for those who want to be able to create VirtualBox virtual machine from command line via SSH and RDP.
Prequisites
As a prerequisite you need to download Debian’s network install CD image.
The script
Here’s the script and I’ll explain it below line by line:
How it works?
In short it works so that you run this script in your existing Linux and you give virtual machine name as the only parameter. It creates a new virtual machine with pretty safe values that all can be changed later (e.g amount of memory).
First we do initialization, check the scripts arguments and assign the first argument as VMNAME variable:
if test $# != 1; then
echo "Usage: $0 vm_name"
exit 0
fi
VMNAME=$1
Then we create and register new virtual machine of type 64bit Debian:
vboxmanage createvm --name $VMNAME --ostype Debian_64 --register
Then we allocate RAM, set power management, set DVD as first booting device, set network in bridged mode and we also specify that the machine would have 2 CPU-s with possibility to hotplug CPU-s:
vboxmanage modifyvm $VMNAME --memory 512 --acpi on --boot1 dvd --nic1 bridged --bridgeadapter1 eth0 --nictype1 virtio --cpus 2 --cpuhotplug on
After that hard drive image is created with size of 4 gigabytes. Make it larger if you have plenty of disk space handy.
vboxmanage createhd --filename ~/VirtualBox\ VMs/testvm/$VMNAME-disk01.vdi --size 4096 --variant Standard
Then we create 2 controllers, one for harddisks (SATA) and the other for CD/DVD (IDE):
vboxmanage storagectl $VMNAME --name "SATA controller" --add sata
vboxmanage storagectl $VMNAME --name "IDE controller" --add ide
Then we attach the newly created hard disk to the controller:
vboxmanage storageattach $VMNAME --storagectl "SATA controller" --port 0 --device 0 --type hdd --medium ~/VirtualBox\ VMs/$VMNAME/$VMNAME-disk01.vdi
As a last thing we attach the downloaded Debian 7 network installation CD image:
vboxmanage storageattach $VMNAME --storagectl "IDE controller" --port 1 --device 0 --type dvddrive --medium /mnt/raid/soft/debian-7.2.0-amd64-netinst.iso
… and we start the virtual machine:
vboxheadless -s $VMNAME &
You’ll be displayed a message similar to this one:
VRDE server is listening on port 3389.
Open a Remote Desktop Client and connect to your host machine’s IP and port 3389. You will see Debian’s installation screen. Install it and off you go!:)
Later you may want to set the default boot device to harddisk instead of DVD:
vboxmanage modifyvm $VMNAME --boot1 disk
ID-infrastructure in Estonia – general info
As you may know Estonia has really great digital identity infrastructure. We can sign fully legal documents (I mean ALL documents) either with our ID-card or with our Mobile-ID. While the first is more common the latter may need some explanation and examples. In both cases there are certificates on the chip (on the SIM-card) and they’re protected with strong crypto. The private certs and keys never leave the chip. For proper authentication 2 things are needed:
– your certificate (on the chip)
– your PIN-code that unlocks the private key on the chip
So the PIN code and the chip alone are pretty useless and thus secure. So much about theory. Now some examples.
Voting with Mobile-ID
I’m on OSX so the examples are based on that fact.
First you download an app from the official elections website https://www.valimised.ee/mac
Open the app and there you see choices for authentication. They’re pretty self explainable.
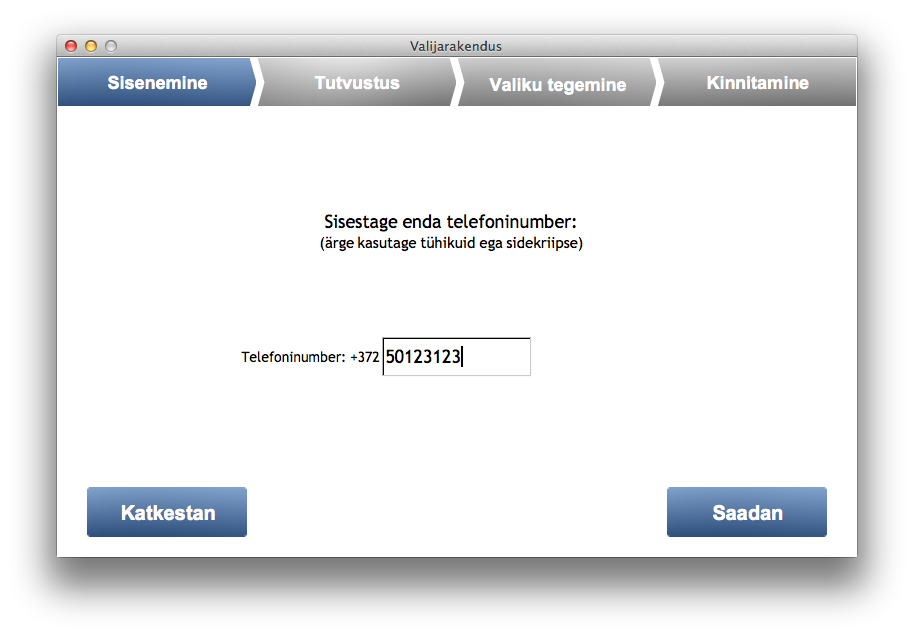
 When I click on mobiil-ID (Mobile-ID) the following dialog appears. It asks for my mobile phone number in order to send me Mobile-ID authentication message. The phone number entered is not mine. Don’t use it:)
After clicking on big blue button “Saada” (Send) the following waiting dialog appears. During that dialog is visible I get a message to my phone that opens special SIM-card application and asks for my Mobile-ID PIN-1: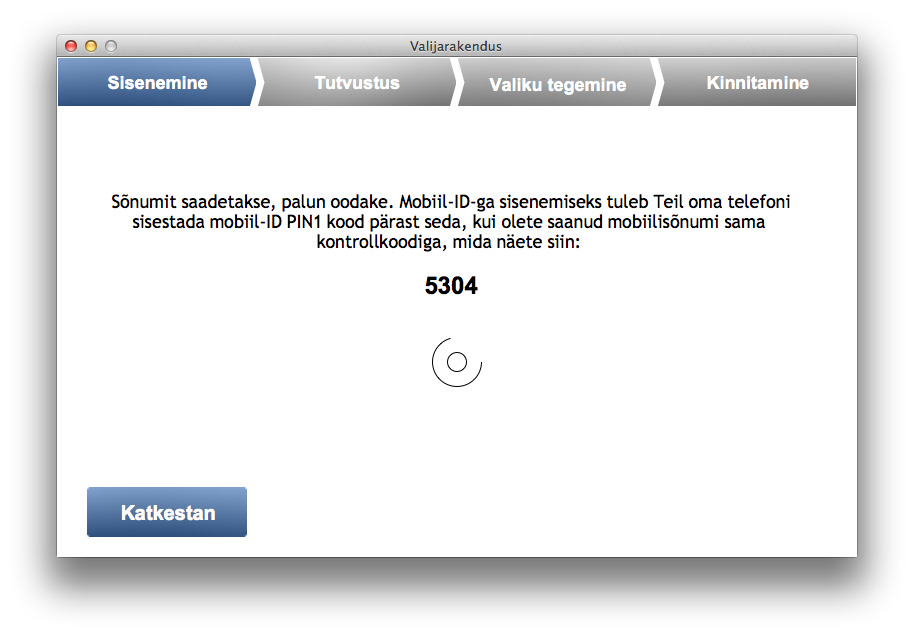
On my mobile phone I see dialog like this:
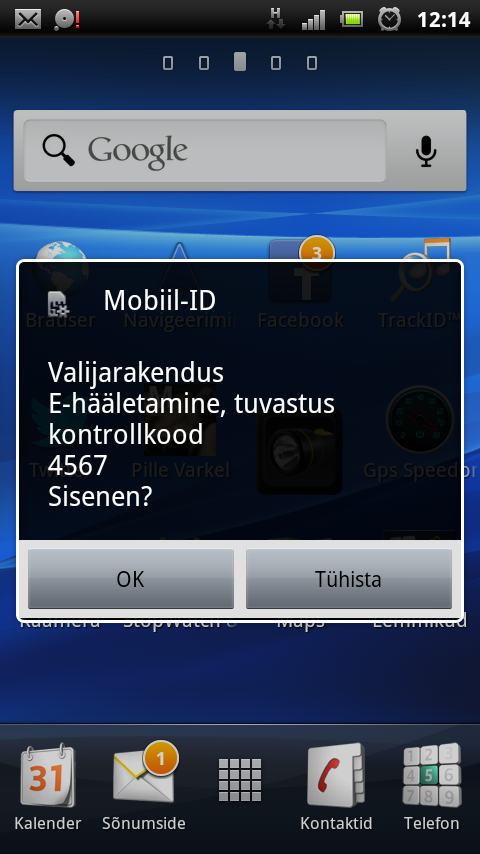
Mind the numbers 5304 and 4567. These don’t match in my example because I made the screenshots from different sessions. These must match, otherwise something’s fishy and someone else might have sent you authentication request (not good).
I enter my PIN-1 on my mobile and that opens my authentication certificate. Background magic happens in ID-infra and I see next screen in my voting app:
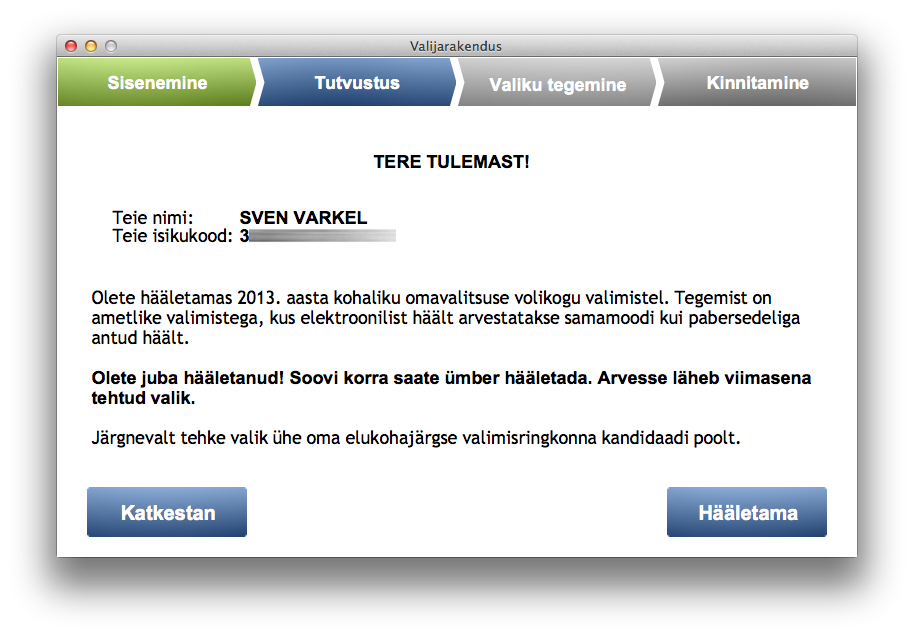
It welcomes me with my name and my personal ID-code (blurred). Then it explains that I can vote and blahblah… In bold it’s important message: it says that I’ve already voted. The trick is that I can vote unlimited times electronically but only the last vote is counted! Even better – if I change my mind then I can got and vote on the real (physical) elections day and then the vote made there will count. But who bothers going out if you can vote like this?:)
I click “Hääletama” (To voting) and I see next screen:

This is the list of candidates. I make my choice and I see it like this:
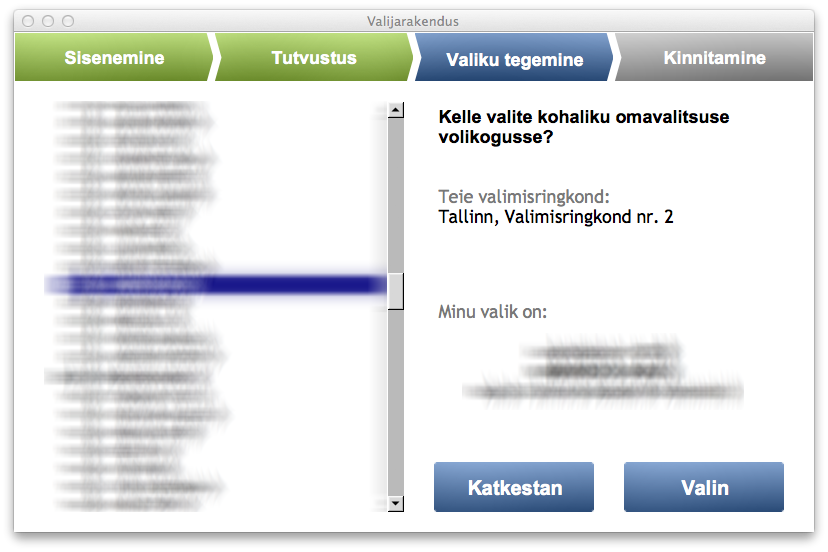
I don’t want to advertise anyone so it’s blurred. Then I have button “Valin” (Vote). After clicking on that I see confirmation screen:
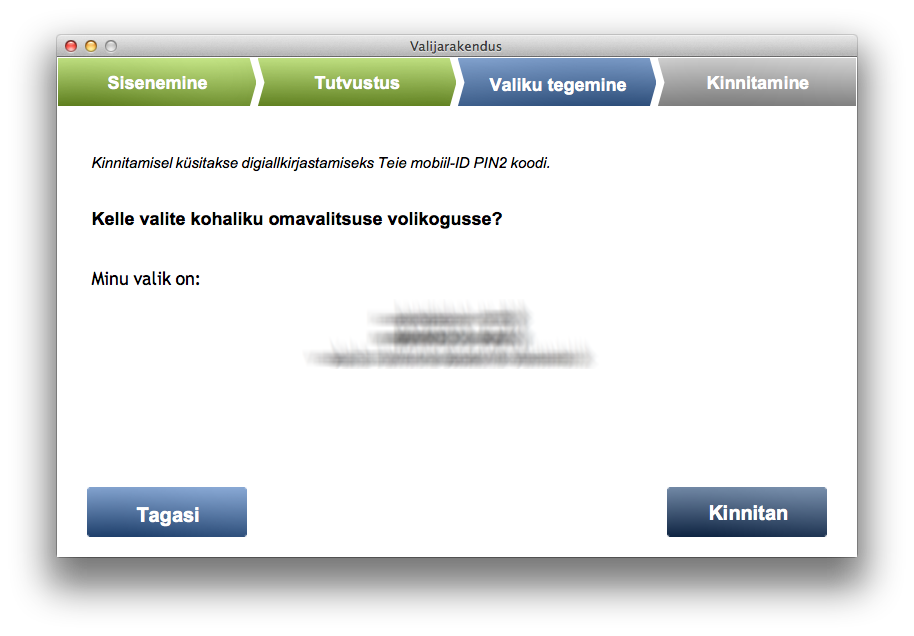
After I click on “Kinnitan” (Confirm) a second message is sent to my mobile phone. I see waiting screen like this:
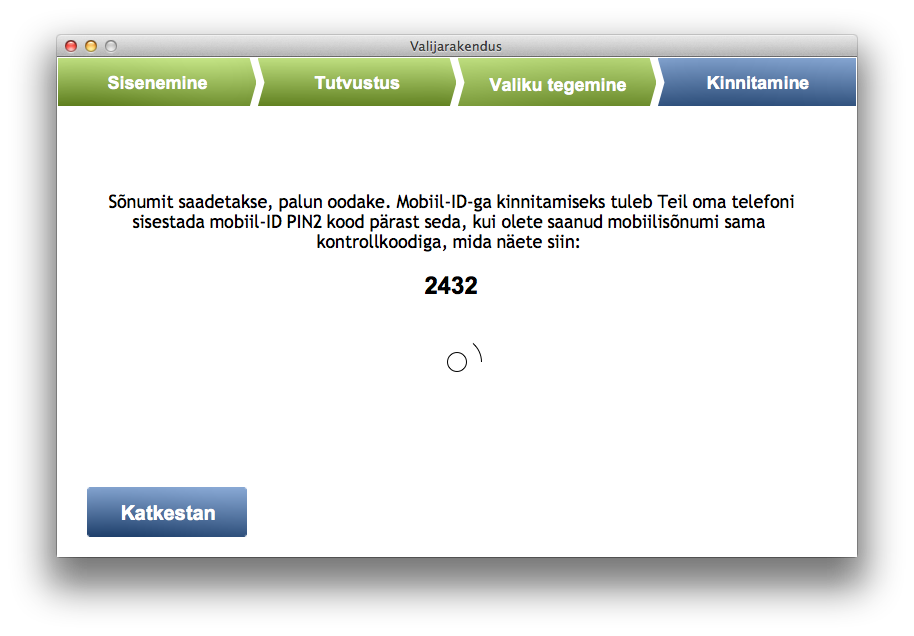
On my mobile I see similar screen as above but this time I’m asked my PIN-2 code which is meant for opening my signing (signature) certificate. After entering PIN-2 I see confirmation screen like this:
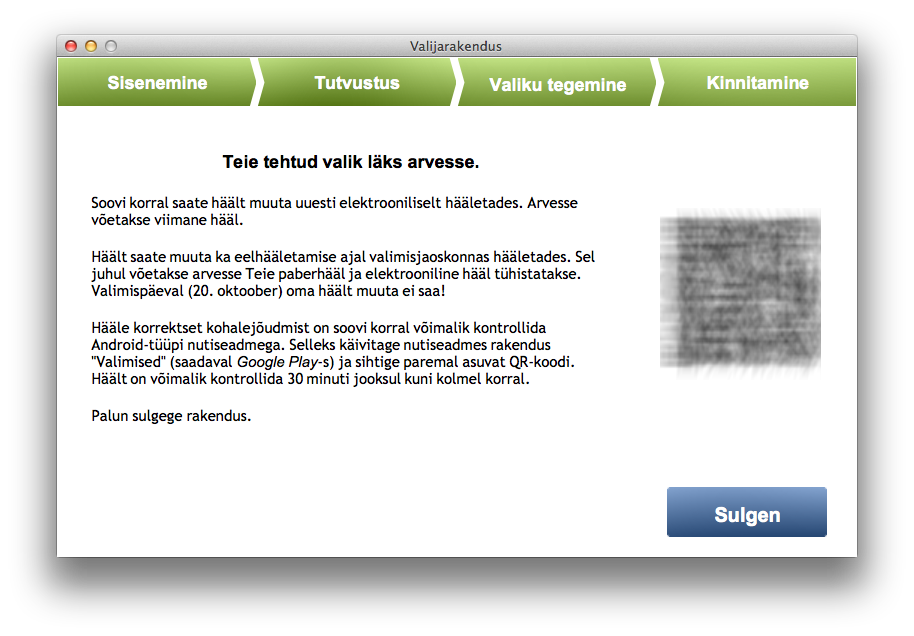
It shows me a QR code that I could use to verify if my vote was accepted and stored properly. It can be verified 30 minutes after voting and max 3 times for security reasons. That’s why I blurred the QR also.
That’s it. It takes max 5 minutes if you know who’s your preferred candidate!:)
I hope whole Europe would adopt our digital ID infrastructure soon.
Go, Estonia!
It’s quite tricky to build gnupg php extension on OSX. I’m using homebrew, so I installed necessary dependencies first:
brew install gpgme
This goes well as most things with brew.
Then I’m trying to install GNUPG PHP PECL extension as the instructions tell me to do:
sudo pecl install gnupg
Bang!!!
I get weird errors like these:
duplicate symbol _gnupg_keylistiterator_class_entry in:
.libs/gnupg.o
.libs/gnupg_keylistiterator.o
duplicate symbol _gnupg_class_entry in:
.libs/gnupg.o
.libs/gnupg_keylistiterator.o
ld: 2 duplicate symbols for architecture x86_64
clang: error: linker command failed with exit code 1 (use -v to see invocation)
make: *** [gnupg.la] Error 1
ERROR: `make' failed
“Tough luck”, I think. But wait… After some googling around PHP bugs I got some hints.
So here’s what you got to do:
- download pecl extension source code
- fix 2 lines in .h and .c files
- phpize, configure and make
- configure PHP extension
- == Profit
pecl download gnupg
In my case it downloads files to /Users/sven/soft/php-5.5.4/ext/gnupg-1.3.3/gnupg-1.3.3.tgz
Unpack the archive:
tar xzf gnupg-1.3.3/gnupg-1.3.3.tgz
cd gnupg-1.3.3
Open file php_gnupg.h and add comments and explanation around line 50:
/* moved next line to gnupg.c
zend_class_entry *gnupg_class_entry;
 */
Copy the line zend_class_entry *gnupg_class_entry; to buffer. Save and exit.
Open file gnupg.c:
Find lines (around 177) and paste copied buffer so it looks like this:
zend_class_entry *gnupg_class_entry;
/* {{{ objects_new */
zend_object_value gnupg_obj_new(zend_class_entry *class_type TSRMLS_DC){
Do similar things with files gnupg_keylistiterator.c and php_gnupg_keylistiterator.h.
Open file php_gnupg_keylistiterator.h around line 69:
/* moved next line to gnupg_keylistiterator.c
 zend_class_entry *gnupg_keylistiterator_class_entry;
 */
Copy line zend_class_entry *gnupg_keylistiterator_class_entry; to buffer. Save and exit.
Open file gnupg_keylistiterator.c around line 72 and make it look like this by pasting buffer:
zend_class_entry *gnupg_keylistiterator_class_entry;
/* {{{ keylistiterator_objects_new */
zend_object_value gnupg_keylistiterator_objects_new(zend_class_entry *class_type TSRMLS_DC){
Save and exit.
Configure, build and install: ./configure make clean && make make install
Now you should have php extension gnupg.so somewhere. I have it in my Cellar:
/usr/local/Cellar/php55/5.5.4/lib/php/extensions/no-debug-non-zts-20121212/gnupg.so
Wherever it is, copy the path to buffer.
Open a new file (your php-s conf.d may be somewhere else!)
vim /usr/local/etc/php/5.5/conf.d/ext-gnupg.ini
And add following lines there:
[gnupg]

extension="/usr/local/Cellar/php55/5.5.4/lib/php/extensions/no-debug-non-zts-20121212/gnupg.so"
Save and exit. Be sure to replace path if your gnupg.so is somewhere else.
Test your php:
php --ri gnupg
It should display something like this:
gnupg
gnupg support => enabled
GPGme Version => 1.4.3
Extension Version => 1.3.3-dev
Thanks!