Archives for : magento

How to delete Magento maintenance.flag without FTP?

Sometimes Magento gets stuck in “Maintenance mode”. It means that there is maintenance.flag file in Magento’s root folder.
The standard maintenance mode of Magento is a bit “too universal” – it sets Magento backend (admin) to maintenance mode also. Once you’re in maintenance mode, it’s hard to get out of this if you don’t have access server’s shell.
Anyway – there is one option if you have not removed Magento Connect Manager (a.k.a /downloader). This program is be impacted by the maintenance.flag file. Log in to Connect Manager at /downloader and check/uncheck checkbox ““.

That’s it.

How to ignore or include files by wildcards in a Magento tgz package

When you’re packing Magento extensions in Magento admin and want to ignore (or include) a file or directory then there’s a special syntax for it. Let’s say you want to exclude folder “tests” from the tgz package. Number signs (#) are used as wildcard placeholders. Add following line to “Ignore” field:

#tests/#
Your tests folder will be excluded from the tgz package.

Part 2: Continuous Integration server to package Magento Extension with a click from JIRA

Starting Magento Connect extension packaging process from JIRA

When I wrote the first part of Continuous Integration server to package Magento Extension I didn’t know how to make it work with a click from JIRA. As you may know in JIRA there’s a way to release versions and trigger Bamboo builds during this release process. That’s what I was aiming – to make it work from JIRA so that it would NOT require any technical knowledge from let’s say Project Manager or Release Manager. I didn’t know it yesterday but here at MageFlow we have a learning mindset. I know it today:)

First – there are now 2 build plans configured in our Bamboo for our MageFlowConnect extension:

  1. “continuous builds” or “CI builds” that are triggered by commits that are made to the git repository that contains MFX code.
  2. “release builds” or “manual builds” that are triggered by clicking “Release” in JIRA

There are 2 main problems with creating Magento extension packages automatically:

  1. when and how to update extension’s version number (in module’s etc/config.xml and in package.xml mentioned in previous post)
  2. how to update release notes inside package.xml. However this one is not mandatory and it’s not resolved yet by us either.

Prerequisites

Install xsltproc to your build server and configure an executable “XSLTProc” in Bamboo.

Updating version numbers

In Part 1 I’ve created a XSL stylesheet that does the job of replacing extension version number in package.xml. Exactly the same XSL can be used to replace version number in extension’s etc/config.xml, too.

In your “CI build” process you may want to have extension version number increased with every build automatically. So that’s what we do  – we set the extension version number to that already defined in package.xml with added Bamboo build number. For example if package.xml contains version number 1.1.3 and Bamboo build # is 43 then the final version number of that extension build would be 1.1.3.43.

In order to replace version numbers in the “CI build” process add following 2 XSLTProc tasks to the build job in Bamboo:

  1. –output public/var/connect/package.xml –stringparam package_version ${bamboo.buildNumber} utils/update_version.xsl public/var/connect/package.xml
  2. –output public/app/code/community/Mageflow/Connect/etc/config.xml –stringparam package_version ${bamboo.buildNumber} utils/update_version.xsl public/app/code/community/Mageflow/Connect/etc/config.xml

First one appends ${bamboo.buildNumber} to existing version number (e.g 1.1.3) in package.xml while second does the same in etc/config.xml

In order to replace version numbers in the “Release build” (build triggered from JIRA) process add following 2 XSLTProc tasks to the build job in Bamboo:

  1. –output public/var/connect/package.xml –stringparam package_version ${bamboo.jira.version} utils/update_version.xsl public/var/connect/package.xml
  2. –output public/app/code/community/Mageflow/Connect/etc/config.xml –stringparam package_version ${bamboo.jira.version} utils/update_version.xsl public/app/code/community/Mageflow/Connect/etc/config.xml

First replaces version in package.xml with the version number specified in JIRA (let’s say 1.1.4) while second does the same in extension’s etc/config.xml

That’s it!:)

Please feel free to comment or send me questions directly.


Continuous Integration server to package Magento Extension

Here’s the situation.

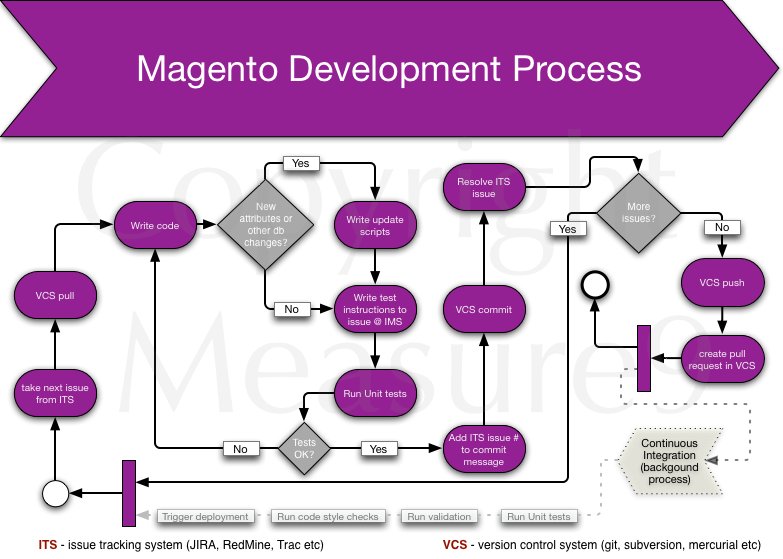
MageFlow is developing Magento Extension called MageFlow Connector. It’s an integration extension that is used to connect a Magento Instance to MageFlow. We are using Agile development processes and state-of-the-art tools by Atlassian like JIRA, Confluence, BitBucket, Bamboo and others. Bamboo is used as build and deployment server that automates a lot of development operations incl building and packaging our software.

Packaging Magento extensions – standard method

Usually Magento extensions are packaged in Magento backend. There’s a form that needs to be filled in with information about specific extension like version number, release notes, files and folders that should be packaged etc. After that you need to upload your extension to Magento Connect and publish it.

It’s pretty good tool but it requires manual work in order to create a package. However in our case we just despise any manual work:) Everything should be automated to max. That’s also why we even started creating MageFlow. Anyway …

Packaging Magento extensions with Bamboo CI

Packaging an extension with Bamboo requires some manual labor too. That cannot be avoided in my opinion. However …

Here’s my wild guess … With a really tight integration between JIRA and Bamboo and some tricks/scripts full automation could be achieved on the way from clicking “Create release” in JIRA to a fully packaged extension as an artifact of a Bamboo build. But right now it’s bit too much work for too little to gain.

But – keeping my head cold and not aiming 100% automation yet I created a following way to package an extension with Bamboo CI.

Prerequisites

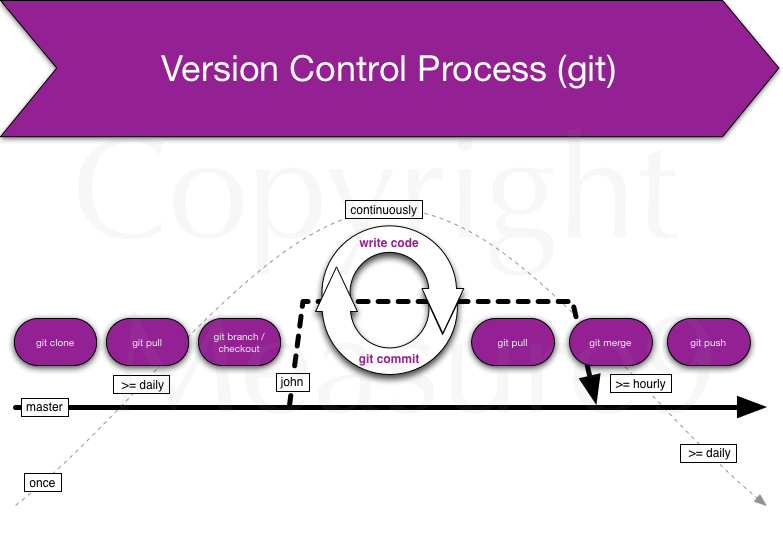
GIT. For extension development we also use modman – a very useful tool for every Magento developer provided by Colin Mollenhour. It is also assumed that you have development environment ready in your local machine or elsewhere where you can prepare the package metainfo.

You also need to have a (preferred – vanilla) Magento (DevMagento) codebase in a GIT repository and you need to have YourExtension in a GIT repository. Make sure your DevMagento works fine and you can log in to the backend (admin).

Let’s name these GIT repositories like that for example:

DevMagento – git@bitbucket.com:myaccount/magento.git

MyExtension: git@bitbucket.com:myaccount/my_extension.git

Prepare Magento extension and modman

First you need to add MyExtension to DevMagento by using modman. In terminal do:

cd /srv/vhosts/magento
modman init
modman clone git@bitbucket.com:myaccount/my_extension.git

Second you need to create MyExtension XML metadata for Magento Connect package. This is done with the Magento Connect tool in Magento backend. Go to System->Magento Connect->Package extensions. Fill in all required fields there. Add version, release notes, files and folders, authors, dependencies etc. Click on “Save” button.

No back to Terminal:

cd /srv/vhosts/magento
ls public/var/connect

You see 2 very important files there now:

MyExtension.xml and package.xml

A mindnote here that package.xml will be overwritten if you package another extension in the backend of the same Magento while being in the same GIT branch.

Now create var/connect folder in your modmanned extension folder and move the files there:

cd /srv/vhosts/magento/.modman/my_extension
mkdir -p var/connect
mv ../../public/var/connect/MyExtension.xml ../../public/var/connect/package.xml var/connect/

Add these files to GIT and to your modman file.

Run modman update to re-create these files under Magento var/connect folder as symlinks:

cd /srv/vhosts/magento
modman update my_extension

Run a packaging test from command line to see if it works:

cd /srv/vhosts/magento/public
./mage package /srv/vhosts/magento/public/var/connect/package.xml
Done building package

It’s needless to say that you need to “git add”, “git commit” and “git push” your stuff etc. Now we’re almost ready to make Bamboo CI to create MyExtension-1.0.0.tgz. Also – see paragraph below about Magento bug after you finish next paragraph about configuring Bamboo.

Configure Bamboo CI

We are using standalone Bamboo CI in our own server. I’m not sure if everything looks the same in the ondemand solution…

Running unit tests on your Magento extension is not covered by this post. However I’m planning another post about this topic, too.

Install modman on your build server and add it as Bamboo executable if you haven’t done so yet.

In Bamboo create a new build plan called My Extension with plan key MYX. (Bamboo upper case plan keys and thus build paths with uppercase characters is where the Magento bug will strike in with its forced lowercase paths).

Add 2 repositories to your Build plan:

  1. DevMagento repository
  2. MyExtension repository

Make your build plan be triggered by periodically scanning the MyExtension repository for changes.

Configure build steps

Step 1: checkout source code from DevMagento repository. You may want to check out clean repo each time. It’s quite quick and you don’t build that extension too often. The reason is that otherwise next step will complain.

Step 2: run modman init. I.e choose modman executable and add “init” as command argument.

Step 3: run modman clone. Choose modman executable and add “clone git@bitbucket.org:myaccount/my_extension.git” as command argument

Step 4: Add a script as build step with ${bamboo.build.working.directory} as an argument to that command. The script is provided in this gist:

This script does 2 things:

  1. it runs mage script that creates Magento package
  2. it moves created tgz package from modmanned extension var/connect folder to Magento’s var/connect folder. The point is that Magento’s Package.php that creates the package uses realpath() PHP function. realpath() resolves symlinks created by modman and that’s why the .tgz package is created under .modman/my_extension/var/connect, not under public/var/connect.

After configuring build steps configure your build artifacts. Specify public/var/connect/ as artifact location and *.tgz as Copy pattern. You can make the artifacts shared so that a Bamboo Deployment plan can use the artifacts and deploy them to – let’s say – your test server;) But that’s another whole story …

Thanks!

Bug in Magento packaging scripts

NB! There’s a bug/misdesign in Magento packaging scripts. The solution is provided as a gist:

You may need to fix it in 2 places: under lib and under download. That’s why I recommended to use a vanilla Magento repository because you need to fix core library files. Create a special Magento repository, fix the bug there and use this Magento for packaging your extensions.

Alternatives

Alan Storm has created a good piece of software that enables creation of a Magento extension package from command line. However I found it too late and I’m not sure about 100% match with my problem.

Summary

It’s a pretty long post that covers quite complex issues. Feel free to leave a comment here or write me directly if you have any questions or thoughts about it.


Update: please see Part 2 of the same topic.

Oneliner for retrieving Magento database password from local.xml

No comments:

Setting up Magento development environment, step by step. Part 3: Naming and structure

Naming and structure

Welcome back to Measure9 blog. Here I continue with article series “Setting up Magento development environment, step by step“. Please read Part 1 and Part 2, too.

I write about naming of things in this post. It’s important, it’s very important because in the long run it defines how you and you’re colleagues are going to talk about things, how you point at things and so on. It’s important to use common terms to build common understanding. Also I’ll explain the importance of SSH keys. I’ve learned to name things thru standards, conventions used in frameworks and long time industry-experience.

I’d like to start with this infamous and very good quote by Phil Karlton:

There are only two hard things in Computer Science: cache invalidation and naming things.

General rules about naming

  1. Never ever use special characters, other than ASCII letters in your file and folder names. Regardless of what Operating Systems claim there will be problems as soon as you move files around between different platforms and systems. I guarantee that. I’ll buy you a beer if you can prove that you’ll never had any problems with file/folder names with special characters 🙂 It’s especially important in non-English countries like Estonia (we have õ, ä, ö, ü), Germany, Sweden, Russia… Basically anywhere outside US and UK. (Side note – regardless of file names your application, your code, your files etc must be in / support UTF-8. That’s a standard.)
  2. Be very careful with case of names, especially when you’re working between case sensitive (all Linuxes), partly case sensitive (OSX) and case insensitive systems (Windows). Always prefer lower case where possible but as you know – Magento’s and Zend’s standards state some rules about class names etc. So just be careful and consistent.
  3. Avoid spaces in file and folder names.
  4. www-prefix is so-20th-century. My suggestion is to phase it out and let it go …

Development folders

Magento development folders/repositories/virtual hosts are kept under /srv/vhosts. Under that folder there are project folders. Usually one project has one, main domain name and it makes sense to name your development folder according to that. It’s easy to remember and it’s unique. Let’s say your customer is example.com. So your folder structure would look like this (explanation is below):

/srv
    /vhosts
        /example.com
            /conf
            /database
            /doc
            /design
            /keys
            /public
            /util

conf – virtual host configuration and other configuration files are in this folder

database – database change scripts, temporary dumps and other database-related stuff this is here

doc – here is project and code documentation (for example generated by ApiGen). Don’t hesitate to use external tools like Google Drive and a WIKI for documentation!

design – here are working PSD files of the theme, HTML templates etc, bought themes, generated/exported graphics, icons etc.

keys – keep SSL certificate keys and other keys in this folder. Here you can also keep project-related passwords in an encrypted file if you’re old-fashioned;)

public – this is the document root of your Magento. In other words this is the public folder that is served by your web server to end users. There are lots of other names that are used for this folder like html, pub, htdocs and so on. I decided to stick to public because it’s used in Zend Framework 2 and it says what it is. Always do remember that this folder is public, publicly accessible!

util – utility and helper scripts are kept in this folder.

Development hostnames (virtual hosts)

Most developers are working in local development machine and this tutorial assumes this way of working. In some cases people use hostnames like example.dev or example.local in their local development machine and these names are pointing to 127.0.0.1 i.e localhost. There are reasons to do like this but this is not good when you need to test integrations like Oauth. Google’s API Console does not support .local domain names. That’s why I suggest usage of following naming structure:

dev.example.com – point it to 127.0.0.1 in your /etc/hosts file.

test.example.com – point it to your test server in DNS.

However usually the DNS is under customer’s control and making changes there is time consuming or impossible. To overcome that you need to use YOUR domain for development and your own / your ISP-s DNS. If that’s the case you could use common naming scheme for development and test:

example.com.dev.mydomain.com – point it to 127.0.0.1

example.com.test.mydomain.com – point to to your test-server’s IP-address

staging.example.com – staging is also called pre-live. It’s an exact copy of live environment but usually it’s using less hardware / virtual servers. It’s the server where content and changes are staged before deploying these to production system (which is example.com or www.example.com).

If customer is having problems with DNS configuration then you can use your own DNS for the staging site also:

example.com.staging.mydomain.com – point it to the staging server’s IP-address

Usernames, passwords

My recommendation is to use e-mail addresses as usernames everywhere where possible. It’s not possible in most Linux shells but it’s possible in Magento’s frontend and backend. People, I mean – nerds and hackers, use all kinds of nicknames but it’s kind of … childish. Isn’t it? So use your e-mail as username in all your Magento solutions (BE and FE) and you and your colleagues know that and they don’t have to ask you every time. Easy to remember and easy to use!

About passwords. Try to avoid them as much as possible. They are just so insecure. Implement Oauth for Magento’s FE and BE login. Ask me if you need help with that.

If you need to create a password for a user for any reason then:

  1. make it complex (at least 12 characters, uppercase, lowercase, numbers and special symbols in it).
  2. make it expired so user must change it at next login and you don’t need to know it.
passwd -e username

This command would expire password for username  and she will be prompted for password change at her next login.

Another useful command is

passwd -d username

That command would remove password from the user’s account so that user can login with SSH key’s only (see below).

In Magento backend create a random password for your colleagues, forget it right there and ask your colleagues to use “Forgot password?” link to reset their password. You’ll test e-mail functionality of your Magento server this way, too 😉

SSH keys, logins, aliases

SSH keys are an excellent way to login without passwords. There is one very important thing to be remember about SSH key pairs:

SSH private key MUST NEVER leave the machine where it was created.

Translation to English: use SSH private key only on that machine where it was created. If you need another one, generate it and distribute another public key.

SSH key pairs can be generated with a simple command:

ssh-keygen

The default values are good in most cases. After you generate the key pair you will have 2 keys in your ~/.ssh folder:

  1. private key
  2. public key

The public key is “inherited” from the private key. Public key as the name says is public. After generating keys you need to distribute the public key to the servers where you want to log in. Usually the public key must be appended to the file ~/.ssh/authorized_keys. In Linux systems there is also command ssh-copy-id that is meant for distributing your public key. Use your password for the last time to distribute your public key and forget/delete your password:)

Setting up Magento development environment, step by step. Part 2: Underlying systems and processes

Underlying systems and processes

Welcome back to Measure9 blog. Here I continue with article series “Setting up Magento development environment, step by step“. Please read Part 1, too. In this post I’m going to shed some light to surrounding processes and most low level tools. So we go from  general to more specific with each subsequent article in this series.

Development process

A quite generic Magento Development Process looks like that. It involves an Issue Tracking System (ITS) and Version Control System (VCS). Also unit testing is in place. If you’re really after quality and fun in development then I do recommend to set up Continuous Integration solution. There is quite a number of solution like Bamboo, Jenkins and others.

Magento Development Process


Version control process

Version control is something that should be in place even if you’re working alone. It helps you to keep your work organised, establish good working habits and integrate your work thru various environments and phases of a project’s lifecycle.

There is a number of Version Control Systems available. To name a few that you already may have heard of:

  1. GIT
  2. Subversion
  3. Mercurial
  4. CVS
  5. ClearCase

See more from Wikipedia. The first 3 are quite modern while CVS is an old dinosaur and ClearCase is a proprietary yet very powerful and integrated system by IBM. Anyway, my gut feeling says that GIT is most widely used nowadays and there are reasons for that.

GIT is

  1. distributed – you can work offline and still keep stuff under control
  2. fast – I mean it’s really fast:)
  3. easy to use, supports easy branching and merging
  4. last but not least – invented by Linus “The Linux Guy” Torvalds himself. Quality…

Now about the process itself (when git is used):

VersionControlProcessGit

Explanation from left to right:

When you start a project you do git clone (1). This gives you working folder with all project’s files. You do it once. Then, every day after your morning coffee you do git pull (2). Git pull gives you updates that have been pushed to upstream by other developers. After that you do git branch (3) if you haven’t done it already. This gives you isolated branch where you can mess around with the code any way you want. There is a number of branching strategies around, you need to choose what suits you best. There’s also a good example of a successful git branching model. Now you’re working with the code and you do git commit (4) (save code version to git). It’s recommended to keep commits small, I’d say atomic. Minimum one commit per fix or per issue from the ITS or per file. You’ll see that it’s good to keep commits small because when they day of rollback comes (and it will!) then you’d be grateful you did small commits that can be rolled back one by one. Then you feel that you’re ready to share your work with others. So you do git pull (5) again to retrieve latest changes from the remote and master branch. Then you merge (6) master branch into your named branch and if it’s cool (no merging errors) you’ll merge your changes back to master. Then you do git push (7) and share your work with others.

Some day (when I have time) I’ll add command line examples here, too.

Choosing hardware and installing operating system

Magento is a resource hog and thus good development hardware is a must. I’m personally using Macbook Air that has SSD permanent storage. It’s fast but standard MB Airs have only 4 gigs memory that is too little:( So you better get yourself a machine with following specs:

  • >= 8 GB RAM
  • >=128 GB SSD disk
  • A good (dual head) video card (for dual monitors)
  • A good keyboard
  • A mouse
  • A pair of good speakers (in case you’re working in your own room;))

Operating system

OSX and Linux are both good choices for Magento (or any web) development. For OSX there’s excellent package manager homebrew that gives you all necessary tools if you’re not satisfied with already built-in Apache web server and somewhat oldish PHP 5.3.

With Linux it’s simple – choose a distro that you like. My recommendation is Ubuntu or Debian. The both have APT package manager that satisfies all your needs.

Installation and configuration of tools will be covered in future posts.

Command line, Terminal application

One more thing is the terminal application. I think the the Linux’ defaults are good but there’s a better alternative for OSX’ Terminal.app and this is iTerm2. Install and use this one instead of native Terminal.app. It provides a few very good convenience functions like “copy when select” and similar.

Resolving Magento extension rewrite conflicts using traits

A bit of history

On 5th of September I sent out a tweet:

Guys, this is serious. I guess, I just resolved Magento’s single intheritance problem by using traits. Details later. #magento #worksforme.

Those who have been serious in hacking Magento and 3rd party extensions know well what I’m talking about. But please let me explain further.

Magento extension rewrite conflicts

You have a Magento instance. You have created a custom module My_Custom that happens to rewrite a core model, let’s say Mage_Catalog_Model_Product. So you have following lines in your module’s config.xml:

Then you have have a 3rd party extension that rewrites the same core class. You’re stuck now? Not quite. You now have 3 good methods to fix the problem. So good so far. But then you need another 3rd party extension that does the same – rewrites catalog/product. Now you’re stuck, right!?
You cannot make your code extend the 1st extension because the the second wouldn’t work and you cannot make yours to extend the second either because the 1st wouldn’t work then. Chicken and egg problem or “nokk kinni, saba lahti” as we say in Estonian.

The solution – PHP 5 feature “traits”

There’s a solution to PHP’s single inheritance feature and Magento rewrites that together make a problem. The solution is achieved by utilizing PHP 5.4 (or newer) feature called traits. So get a coffee (it’s pretty long post) and let’s start.
We have a situation where 3 classes want to rewrite and extend Magento’s Mage_Catalog_Model_Product:
My_Custom_Model_Product (this is mine that I can freely change)
Extension_A_Model_Product
Extension_B_Model_Product
Let’s say Extension_A_Model_Product adds the following methods to catalog/product:
And let’s assume Extension_B_Model_Product wants to add the following methods to catalog/product:
And at last my custom module wants to add something extra to the core product model:

The idea is to make only My_Custom_Model_Product to rewrite catalog/product or at least to be the first one selected for rewrites. The other 2 3rd party module classes would just extend it and be used inside my product model via traits.

Add dependencies to your module

First it’s necessary to add dependencies to your module XML. This is to ensure the loading order of classes and rewrites.

Add traits

Folder Traits should be created under extension’s folder in similar manner to Block, Product and Helper:
My/Custom/Trait.
For naming we follow the same logic as other Magento building blocks but there’s no shorthand for traits as it exists for blocks, models and helpers (e.g catalog/product etc). No worries, the trait would still be found and loaded by the autoloader.
Under that folder create the trait folders and files for classes Extension_A_Model_Product and Extension_B_Model_Product
My/Custom/Trait/Extension/A/Model/Product.php

My/Custom/Trait/Extension/B/Model/Product.php

Trait for Extension_A_Model_Product

Trait for Extension_B_Model_Product

Add traits to My_Custom_Model_Product

Voilaa!:) Now you have all the 3rd party module functionality available in your extension. When Magento is calling getModel(‘catalog/product’) it will actually load My_Custom_Model_Product. My_Custom_Model_Product extends Mage_Catalog_Model_Product and it also exposes all methods from Extension_A_Model_Product and Extension_B_Model_Product.

A note about traits

With traits you can avoid duplicating original class method implementation’s part. You’ll just create a proxy for original class method’s thru the trait. However you need to maintain the traits whenever Extension_A or Extension_B are upgraded or changed. So you should document it that you created traits and solved multiple rewrite problem this way. Then you can look up the documentation when doing upgrade to extensions next time.

As always – feedback is welcome!

Setting up Magento development environment, step by step. Part 1: Introduction

Intro to article series

In this serie of articles I’m going to provide step by step instructions for setting up a fully working development environment for your Magento (or actually ANY PHP5) development project.
I start from the lowest level – from choosing the hardware and the article series will be finished with tips for tuning your Nginx, PHP5 and MySQL (MariaDB) to squeeze out the maximum performance that you need whole developing Magento.

About naming things

Here and there I call the database server as “MySQL” but what I mean is MariaDB 5.5.
Here and there I may call PHP5-FPM “PHP5” for the sake of shortness.
When I say PHP or PHP5 I mean the most recent version PHP 5.5.
OSX – I mean the current official version 10.8 Mountain Lion as of time of writing this post.
Linux – I mean Debian 7 – “Wheezy”.

Words of warning or The Disclaimer

First – nobody is (unfortunately:)) paying me anything to promote their software. All choices have been made based on my loooong experience in this industry and some research I’ve done before and during writing if this article series. I’ll try to provide some more justification of choices made under every section for every important component.
Everything described in this blog must be taken with caution. I mean – think twice (and measure 9 times!) before you put anything to production environments. I don’t take any responsibility or blame for data loss or loss of your job or whatever loss that may or may not be caused by following my instructions. In short – I write whatever I want and you’re the one that must think before executing anything written here. This is called “talupojatarkus” or “common sense” in Estonia🙂

Now when this is clear let’s get the hands dirty!

The structure of articles

I’ll give you instructions for 2 major development platforms – Linux and OSX. In general these 2 are perfect platforms for web development. One is free and open source while the other is commercial yet very good.  So you have choice.
The articles are organised like this where all major bullets are articles:

  1. Introduction (current article)
    1. A few words about suitable hardware
    2. No promises made but still … (planning following articles)
  2. Underlying systems and processes
    1. Development process
    2. Version control process
    3. Choosing hardware and installing operating system
    4. Remove unwanted stuff
    5. Command line, Terminal app
  3. Naming and structure
    1. Development folders
    2. Development hostnames (virtual hosts)
    3. Usernames, passwords
    4. SSH keys
  4. Components installation & configuration
    1. MariaDB
    2. PHP5-FPM
    3. Socket or TCP?
    4. Nginx
    5. a special file /etc/hosts
    6. Openssl for HTTPS
    7. keys, self-generated certificates
    8. optional – phpMyAdmin
  5. Source Code Version Control
    1. git …
    2. … or svn. No and why?
    3. Bitbucket
    4. Github
    5. Beanstalk
  6. Security
    1. Bind MySQL to localhost
    2. Keep your sites closed when in public WIFI-s
    3. Use HTTPS
  7. Installing Magento
    1. create database, db user and password
    2. file permissions
    3. special folders
    4. .gitignore
    5. useful utilities
  8. Choosing the IDE
    1. Netbeans
    2. PHPStorm
    3. Others (Komodo, Zend Studio)
  9. Setting up xDebug for debugging your solution
    1. “Local” remote debugger
    2. Breakpoints
    3. Call stack
    4. Variables
    5. Remote debugger
  10. Performance tuning, tips and tricks
    1. MariaDB
    2. Nginx
    3. PHP5-FPM
I leave myself freedom to make improvements to the topics while the serie is developing. 

A few words about suitable hardware

Currently I use Macbook Air with 4 GB RAM and I must say it’s too little. Magento is a big and hungry beast , all IDE-s are in hunger for more and more memory (Java!) and when you want to use xDebug then you’re pretty much stuck. So MB Air can almost do with SSD saving the day but my next machine will be something with 8 GB of RAM or more. I guess nobody’s talking about desktops nowadays any more, right? Still – an iMac is good choice in case you don’t need to move around to much. Since I do a lot of consultation and solutions architecture I have to be in the meetings and it would be a bit tedious to haul an Imac or – even worse – a PC with a monitor around, right…:) OK, I’m joking but in short – a good laptop is a good choice nowadays. Choose a PC laptop or a Mac laptop based on budget or whatever the reasons are – I’ll provide instructions for both.

No promises made but still …

As a busy guy I cannot make big promises but I’ll do my best to provide you a minimum 1 article a week. Hopefully I can do better than this. Feedback is very much appreciated as my ultimate goal is to develop a solution that would be kind of standard for all Magento development projects that are yet to be launched. So all help and feedback and comments are welcome.

Provide feedback

Here’s the first request to you, dear readers – please provide your wishes in the comments about what you’d like to read about in this serie or if there’s anything important that I forgot from the TOC. Thanks!

Logging PHP errors in the same folder with Magento error logs

Here’s another post regarding logging…

How to log PHP errors to the same folder than Magento error logs?

It’s quite simple with Nginx and PHP5-FPM. In Nginx virtual host configuration file there is quite likely block like that:

location ~ .php$ {
if (!-e $request_filename) { rewrite / /index.php last; }
fastcgi_pass unix:/var/run/php5-fpm.sock;
fastcgi_param HTTPS $fastcgi_https;
fastcgi_param SCRIPT_FILENAME $document_root$fastcgi_script_name;
fastcgi_param MAGE_RUN_CODE ee;
fastcgi_param MAGE_RUN_TYPE website;
fastcgi_read_timeout 600;
include /etc/nginx/fastcgi_params;
}

In order to make PHP error logs go to the same folder than Magento’s (/var/log/… add following lines to your virtual host configuration block:

    fastcgi_param   PHP_VALUE "log_errors=on";
fastcgi_param PHP_VALUE "display_errors=off";
fastcgi_param PHP_VALUE "error_log=$document_root/var/log/php_errors.log";

These are standard PHP directives.
log_errors – this one states that erros must be logged
display_errors – it’s always good to keep it off anywhere else than in your local development machine
error_log – this does the trick. It forces PHP logs for current virtual host to var/log folder under your Magento instance folder.

So the final block should look like this:

location ~ .php$ {
if (!-e $request_filename) { rewrite / /index.php last; }
fastcgi_pass unix:/var/run/php5-fpm.sock;
fastcgi_param HTTPS $fastcgi_https;
fastcgi_param SCRIPT_FILENAME $document_root$fastcgi_script_name;
fastcgi_param MAGE_RUN_CODE ee;
fastcgi_param MAGE_RUN_TYPE website;
fastcgi_read_timeout 600;
fastcgi_param PHP_VALUE "log_errors=on";
fastcgi_param PHP_VALUE "display_errors=off";
fastcgi_param PHP_VALUE "error_log=$document_root/var/log/php_errors.log";
include /etc/nginx/fastcgi_params;
}

Restart nginx and there you go. You can now tail or less the logs from /var/log/php_errors.log