Archives for : osx

Poor man’s VPN using SSH and SOCKS proxy for MacOS

Add the following aliases to your .bash_profile:

alias socks_on="ssh -D 8666 -C -N -f -M -S ~/.socks.socket $USER@<your_office_gateway>; networksetup -setsocksfirewallproxystate Wi-Fi on;"
alias socks_off="networksetup -setsocksfirewallproxystate Wi-Fi off; ssh -S ~/.socks.socket -O exit $USER@<your_office_gateway>;"

Later you can start your tunnel with command

socks_on

and stop it with

socks_off


😉

PHPStorm and OSX Yosemite Java problem

Problem

I just upgraded to OSX Yosemite. It looks pretty cool and works fine. In addition to Java, CSS, Javascript we are writing a lot of PHP while develop data management solution MageFlow for Magento.

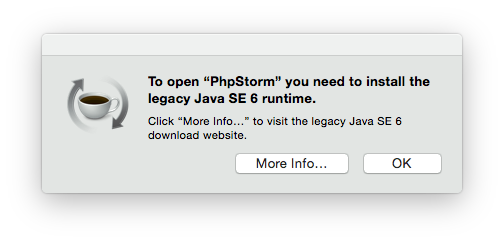
I noticed a problem when I tried to start my everyday IDE PhpStorm:

phpstorm_java


Stop! I just upgraded to a fresh, new OSX and I’m forced to install an almost 10 year old Java? Nope…

I have Java 8 installed to my Mac and I thought it would be cool to run PhpStorm on top of that one.

So I looked around and the solution is surprisingly simple.

Solution 1 (deprecated – see the update)

Open file /Applications/PhpStorm.app/Contents/Info.plist with your favorite editor (mine is vim)

Find the following tag:

<key>JMVVersion</key>

Below that one there should be

<string>1.6*</string>

or similar.

Replace 1.6* with

<string>1.8*</string>

Start PhpStorm.

😉


Important update

It’s important to know that changing the Info.plist file would break the application’s digital signature. There are consequences like the app asking for firewall permissions on each start and not the patches not being applied properly. See more info on JetBrains Support page.

In short you need to add the wanted Java version to a preference file instead of hacking application’s Info.plist.

In my case I created file ~/Library/Preferences/WebStorm9/idea.properties with contents:

JVMVersion=1.8*

This applies for WebStorm but it’s done the same way for all JetBrains IDE-s. Just change the app name in the path.

For PhpStorm put the file to:

~/Library/Preferences/WebIde80/idea.properties

Building GNUPG for PHP 5.5 on OSX

It’s quite tricky to build gnupg php extension on OSX. I’m using homebrew, so I installed necessary dependencies first:

brew install gpgme

This goes well as most things with brew.

Then I’m trying to install GNUPG PHP PECL extension as the instructions tell me to do:

sudo pecl install gnupg

Bang!!!

I get weird errors like these:

duplicate symbol _gnupg_keylistiterator_class_entry in:
.libs/gnupg.o
.libs/gnupg_keylistiterator.o
duplicate symbol _gnupg_class_entry in:
.libs/gnupg.o
.libs/gnupg_keylistiterator.o
ld: 2 duplicate symbols for architecture x86_64
clang: error: linker command failed with exit code 1 (use -v to see invocation)
make: *** [gnupg.la] Error 1
ERROR: `make' failed

“Tough luck”, I think. But wait… After some googling around PHP bugs I got some hints.

So here’s what you got to do:

  1. download pecl extension source code
  2. fix 2 lines in .h and .c files
  3. phpize, configure and make
  4. configure PHP extension
  5. == Profit
pecl download gnupg

In my case it downloads files to /Users/sven/soft/php-5.5.4/ext/gnupg-1.3.3/gnupg-1.3.3.tgz

Unpack the archive:

tar xzf gnupg-1.3.3/gnupg-1.3.3.tgz
cd gnupg-1.3.3

Open file php_gnupg.h and add comments and explanation around line 50:

/* moved next line to gnupg.c
zend_class_entry *gnupg_class_entry;
 */

Copy the line zend_class_entry *gnupg_class_entry; to buffer. Save and exit.

Open file gnupg.c:

Find lines (around 177) and paste copied buffer so it looks like this:

zend_class_entry *gnupg_class_entry;
/* {{{ objects_new */
zend_object_value gnupg_obj_new(zend_class_entry *class_type TSRMLS_DC){

Do similar things with files gnupg_keylistiterator.c and php_gnupg_keylistiterator.h.

Open file  php_gnupg_keylistiterator.h around line 69:

/* moved next line to gnupg_keylistiterator.c
 zend_class_entry *gnupg_keylistiterator_class_entry;
 */

Copy line zend_class_entry *gnupg_keylistiterator_class_entry; to buffer. Save and exit.

Open file gnupg_keylistiterator.c around line 72 and make it look like this by pasting buffer:

zend_class_entry *gnupg_keylistiterator_class_entry;
/* {{{ keylistiterator_objects_new */
zend_object_value gnupg_keylistiterator_objects_new(zend_class_entry *class_type TSRMLS_DC){

Save and exit.

Configure, build and install: ./configure make clean && make make install

Now you should have php extension gnupg.so somewhere. I have it in my Cellar:

/usr/local/Cellar/php55/5.5.4/lib/php/extensions/no-debug-non-zts-20121212/gnupg.so

Wherever it is, copy the path to buffer.

Open a new file (your php-s conf.d may be somewhere else!)

vim /usr/local/etc/php/5.5/conf.d/ext-gnupg.ini

And add following lines there:

[gnupg]

extension="/usr/local/Cellar/php55/5.5.4/lib/php/extensions/no-debug-non-zts-20121212/gnupg.so"

Save and exit. Be sure to replace path if your gnupg.so is somewhere else.

Test your php:

php --ri gnupg

It should display something like this:

gnupg
gnupg support => enabled
GPGme Version => 1.4.3
Extension Version => 1.3.3-dev

Thanks!


Setting up Magento development environment, step by step. Part 2: Underlying systems and processes

Underlying systems and processes

Welcome back to Measure9 blog. Here I continue with article series “Setting up Magento development environment, step by step“. Please read Part 1, too. In this post I’m going to shed some light to surrounding processes and most low level tools. So we go from  general to more specific with each subsequent article in this series.

Development process

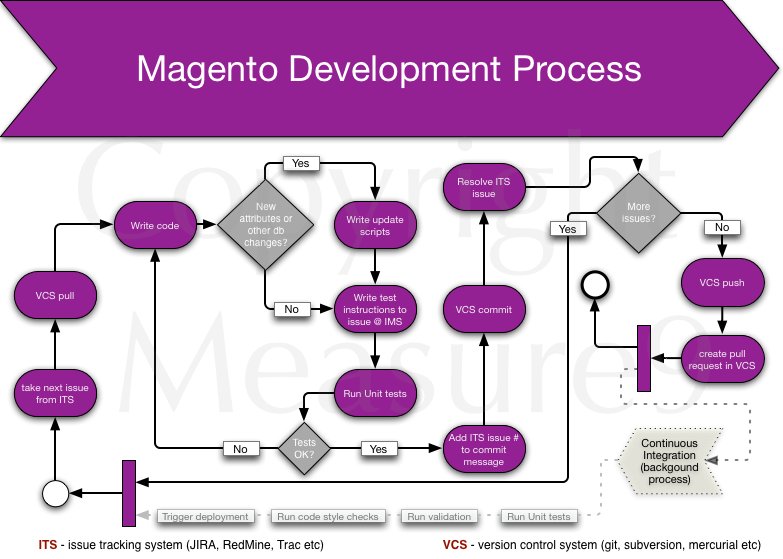
A quite generic Magento Development Process looks like that. It involves an Issue Tracking System (ITS) and Version Control System (VCS). Also unit testing is in place. If you’re really after quality and fun in development then I do recommend to set up Continuous Integration solution. There is quite a number of solution like Bamboo, Jenkins and others.

Magento Development Process


Version control process

Version control is something that should be in place even if you’re working alone. It helps you to keep your work organised, establish good working habits and integrate your work thru various environments and phases of a project’s lifecycle.

There is a number of Version Control Systems available. To name a few that you already may have heard of:

  1. GIT
  2. Subversion
  3. Mercurial
  4. CVS
  5. ClearCase

See more from Wikipedia. The first 3 are quite modern while CVS is an old dinosaur and ClearCase is a proprietary yet very powerful and integrated system by IBM. Anyway, my gut feeling says that GIT is most widely used nowadays and there are reasons for that.

GIT is

  1. distributed – you can work offline and still keep stuff under control
  2. fast – I mean it’s really fast:)
  3. easy to use, supports easy branching and merging
  4. last but not least – invented by Linus “The Linux Guy” Torvalds himself. Quality…

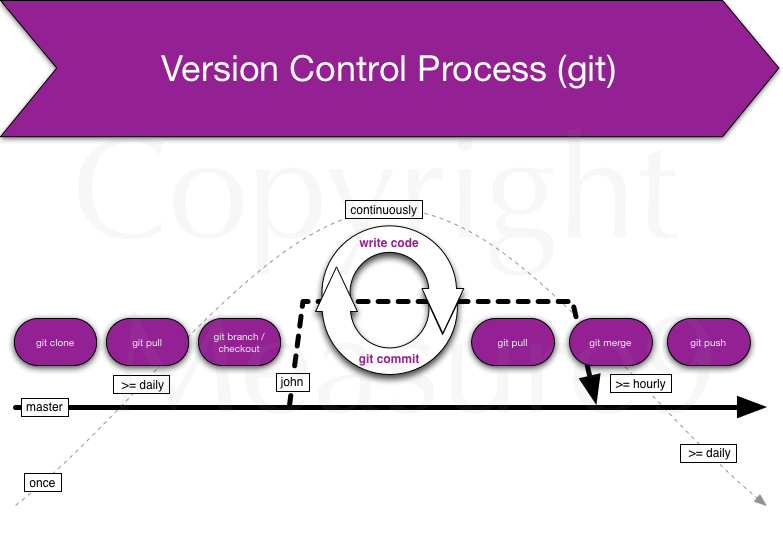
Now about the process itself (when git is used):

VersionControlProcessGit

Explanation from left to right:

When you start a project you do git clone (1). This gives you working folder with all project’s files. You do it once. Then, every day after your morning coffee you do git pull (2). Git pull gives you updates that have been pushed to upstream by other developers. After that you do git branch (3) if you haven’t done it already. This gives you isolated branch where you can mess around with the code any way you want. There is a number of branching strategies around, you need to choose what suits you best. There’s also a good example of a successful git branching model. Now you’re working with the code and you do git commit (4) (save code version to git). It’s recommended to keep commits small, I’d say atomic. Minimum one commit per fix or per issue from the ITS or per file. You’ll see that it’s good to keep commits small because when they day of rollback comes (and it will!) then you’d be grateful you did small commits that can be rolled back one by one. Then you feel that you’re ready to share your work with others. So you do git pull (5) again to retrieve latest changes from the remote and master branch. Then you merge (6) master branch into your named branch and if it’s cool (no merging errors) you’ll merge your changes back to master. Then you do git push (7) and share your work with others.

Some day (when I have time) I’ll add command line examples here, too.

Choosing hardware and installing operating system

Magento is a resource hog and thus good development hardware is a must. I’m personally using Macbook Air that has SSD permanent storage. It’s fast but standard MB Airs have only 4 gigs memory that is too little:( So you better get yourself a machine with following specs:

  • >= 8 GB RAM
  • >=128 GB SSD disk
  • A good (dual head) video card (for dual monitors)
  • A good keyboard
  • A mouse
  • A pair of good speakers (in case you’re working in your own room;))

Operating system

OSX and Linux are both good choices for Magento (or any web) development. For OSX there’s excellent package manager homebrew that gives you all necessary tools if you’re not satisfied with already built-in Apache web server and somewhat oldish PHP 5.3.

With Linux it’s simple – choose a distro that you like. My recommendation is Ubuntu or Debian. The both have APT package manager that satisfies all your needs.

Installation and configuration of tools will be covered in future posts.

Command line, Terminal application

One more thing is the terminal application. I think the the Linux’ defaults are good but there’s a better alternative for OSX’ Terminal.app and this is iTerm2. Install and use this one instead of native Terminal.app. It provides a few very good convenience functions like “copy when select” and similar.